skip to main |
skip to sidebar

Chapter One
Train Carriage
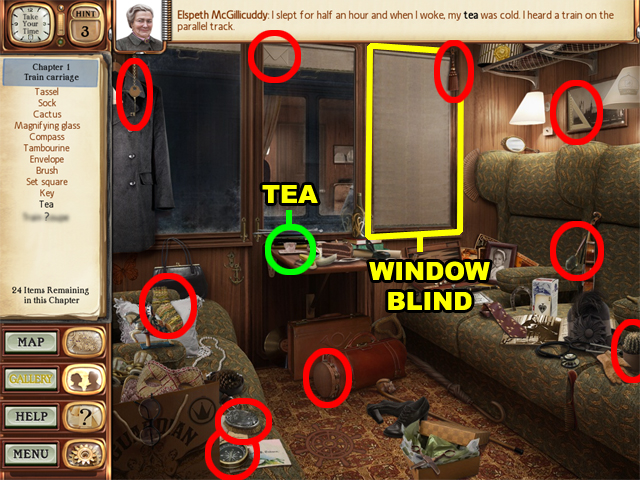
- Enter the Train Carriage location (highlighted on the World map) to arrive at this scene.
- Collect the normal items before collecting the KEY ITEMS. Not everyone will receive the same normal items.
- Collect the TEA to reveal the blurred KEY ITEM on the list.
- Collect the WINDOW BLIND afterwards to complete this scene.
World Map

- This time you will have to find the next location manually.
- Locate the Paddington Station above Hyde Park and then enter it.
Paddington Station

- From now on you will not have to collect the normal items before the KEY ITEMS.
- Collect the TICKET near the lower left corner to reveal the PEN item.
- Collect the PEN beside the suit to complete this scene.
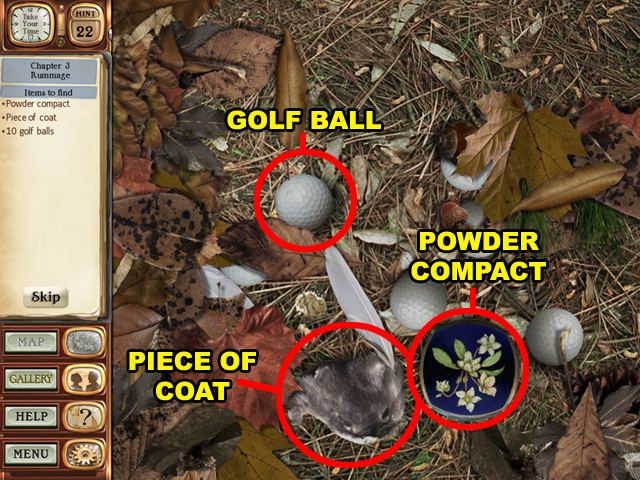
Rummage
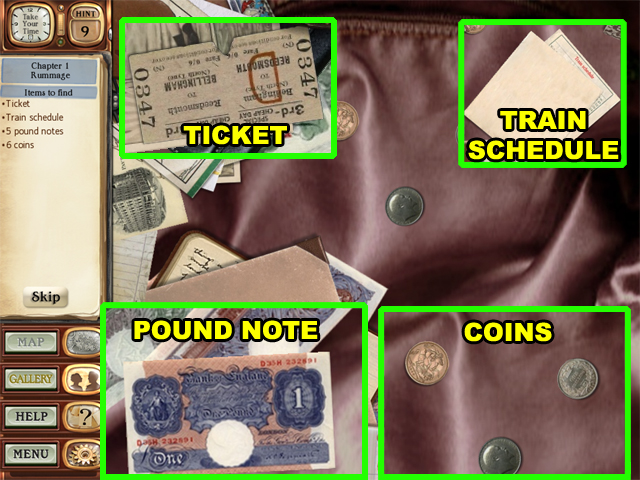
- Drag the items around until you find the 4 varieties of the listed items. Hold the left mouse-button to drag an item.
- This screenshot displays each of the 4 kinds of items. Collect these items to complete this chapter.
Chapter Two
World Map
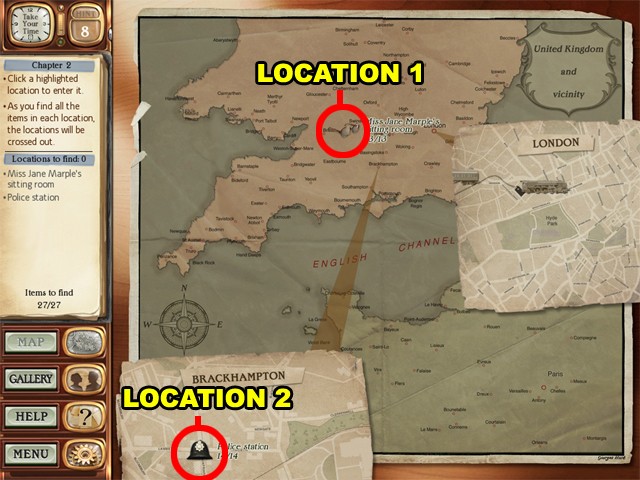
- Locate the 1st location above the center of the World map. Afterwards, a smaller map will appear at the bottom of this screen.
- Locate the 2nd location on the Brackhampton map.
- Enter Miss Jane Marple’s Sitting Room first.
Miss Jane Marple’s Sitting Room
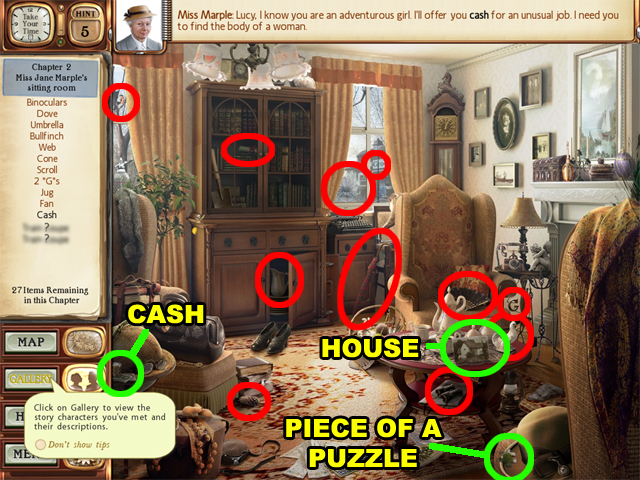
- Collect the normal items first.
- Collect the CASH item in the lower left corner.
- Collect the HOUSE item on the table afterwards.
- Collect the PIECE OF A PUZZLE item near the lower right corner to complete this chapter.
- Enter the Police Station afterwards.
Police Station
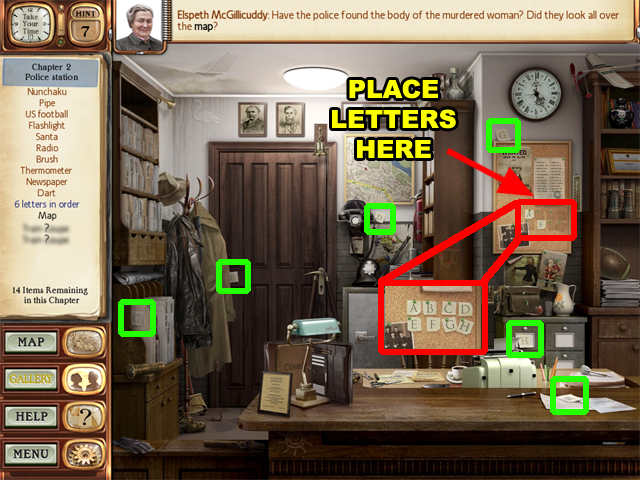
- Drag and drop the 6 LETTERS into their proper silhouettes on the poster board. The LETTERS are highlighted in green.
- The letters should be placed into the silhouettes in alphabetical order (“A” through “H”). Afterwards the 6 LETTERS IN ORDER will be crossed off of the list.
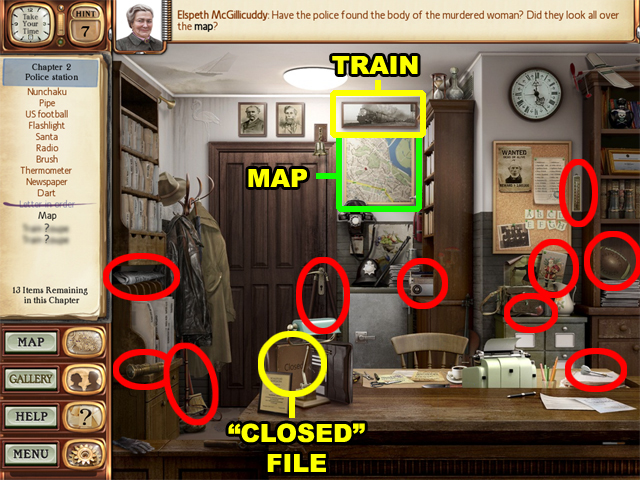
- Collect the MAP on the wall.
- Collect the TRAIN above the where the MAP was.
- Collect the “CLOSED” FILE on the left side of the desk to complete this scene.
Clue Matching
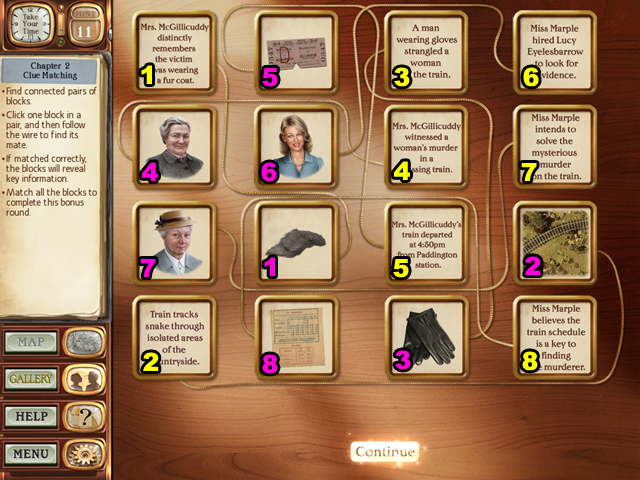
- Pair the cards which are linked by a common wire.
- The cards in this screenshot have been numbered to match their corresponding cards. Pair the cards with matching numbers to locate the correct pairs.
- Although the contents of the blocks are random, the wire connections are always the same.
- Complete this puzzle to complete this chapter.
Chapter Three
World Map
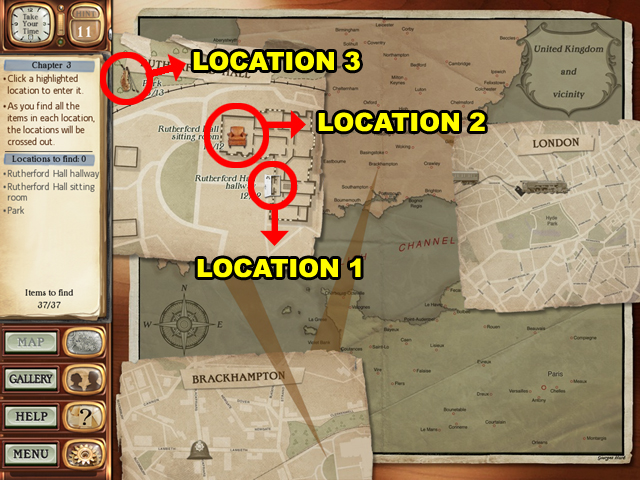
- Locate the 3 locations hidden on the Rutherford Hall map.
- Enter the Rutherford Hall Hallway afterwards.
Rutherford Hall Hallway
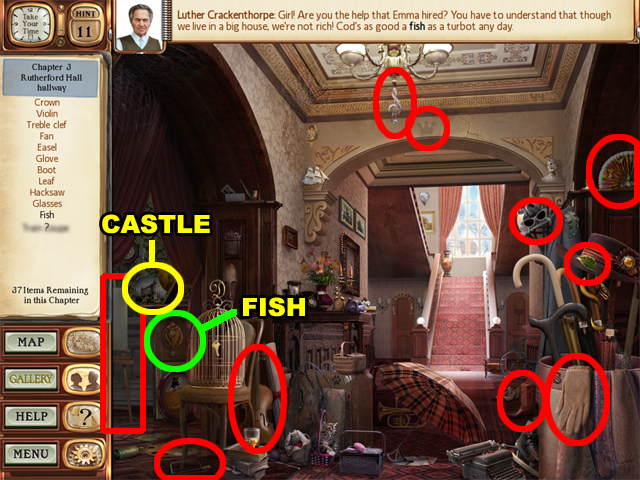
- Collect the FISH item above the lower left corner.
- Collect the CASTLE item above the lower left corner as well.
- Enter the Rutherford Hall Sitting Room after completing this scene.
Rutherford Hall Sitting Room
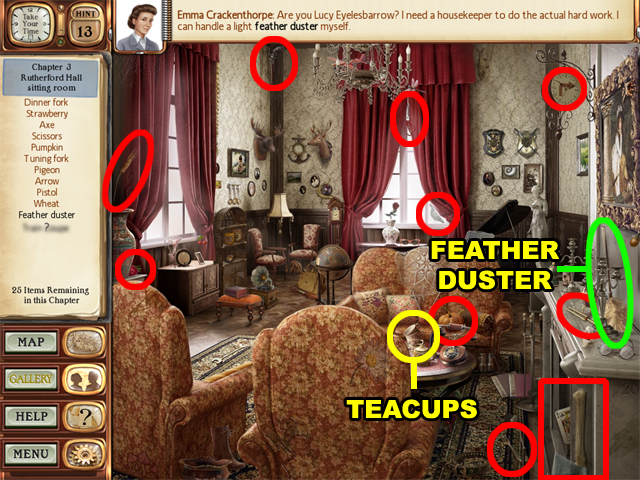
- Collect the FEATHER DUSTER above the fireplace.
- Collect the TEACUPS on the table afterwards.
- Visit the Park location next.
Park
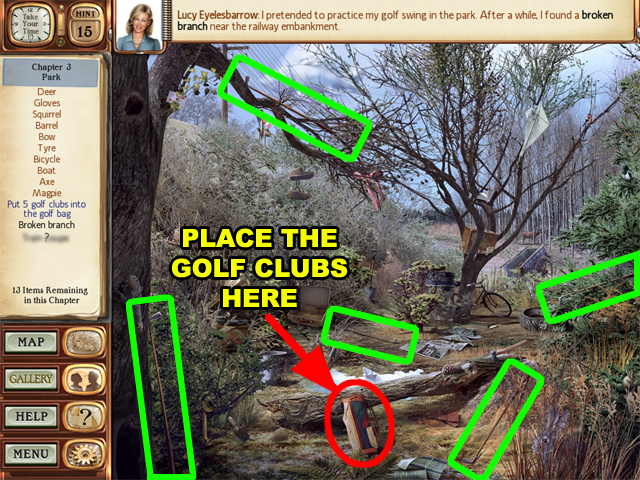
- Drag and drop the 5 GOLF CLUBS into the GOLF BAG. The GOLF CLUBS are highlighted in green.
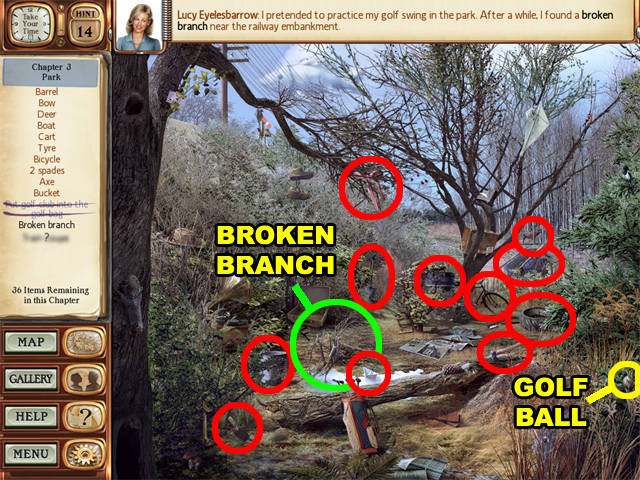
- Collect the BROKEN BRANCH near the center of this scene.
- Collect the GOLF BALL above the lower right corner to complete this scene.
Rummage
- Rummage through everything until the hidden items are found.
- Complete this puzzle to conclude this chapter.
Chapter Four
World Map
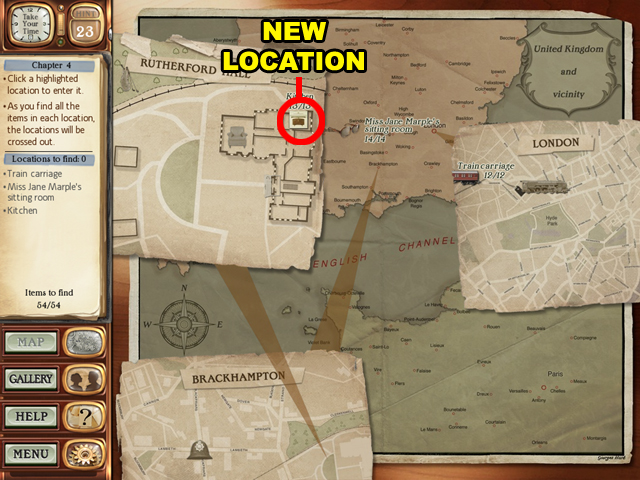
- Find the new location on the Rutherford Hall map.
- Visit the Train Carriage location first.
Train Carriage
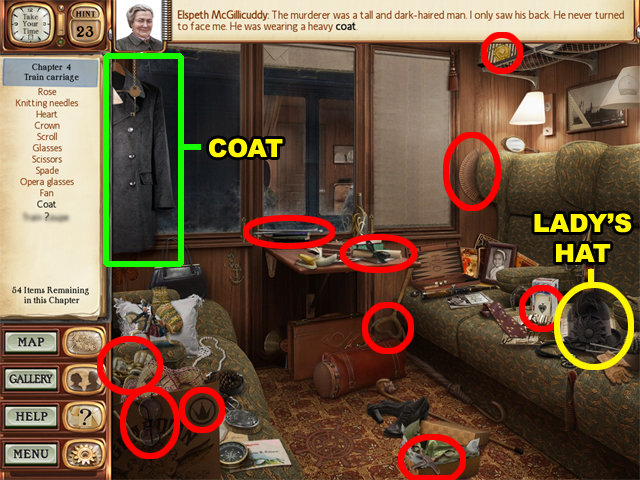
- Collect the COAT in the upper left corner.
- Collect the LADY’S HAT above the lower right corner afterwards.
- Enter Miss Jane Marple’s Sitting Room after finding all of the items.
Miss Jane Marple’s Sitting Room
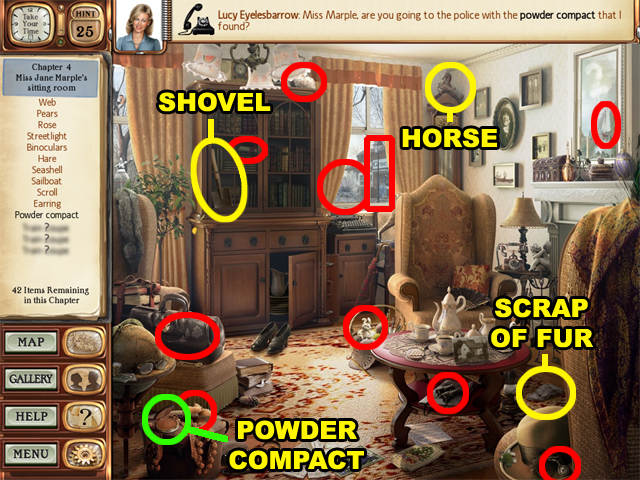
- Collect the POWDER COMPACT in the lower left corner.
- Collect the SCRAP OF FUR above the lower right corner.
- Collect the SHOVEL in the bookcase.
- Collect the HORSE above the chair in the center of this room.
- Visit the Kitchen location after completing this scene.
Kitchen
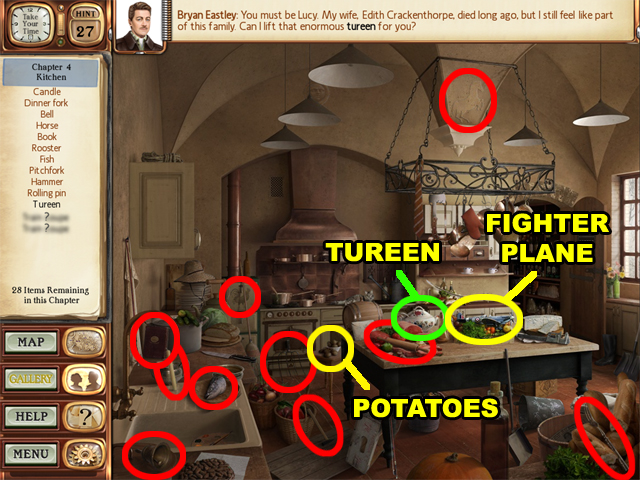
- Collect the TUREEN on the table.
- Collect the POTATOES to the left of the table.
- Collect the FIGHTER PLANE on the table.
- After completing this scene you will be taken to the map screen.
World Map
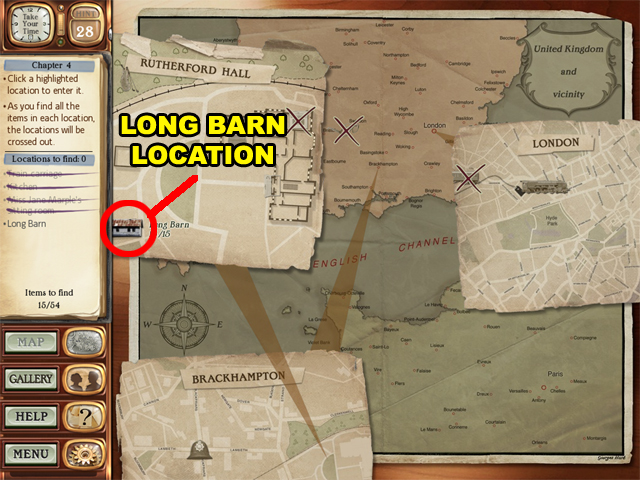
- Locate the Long Barn location on the Rutherford Hall map and enter it.
Long Barn
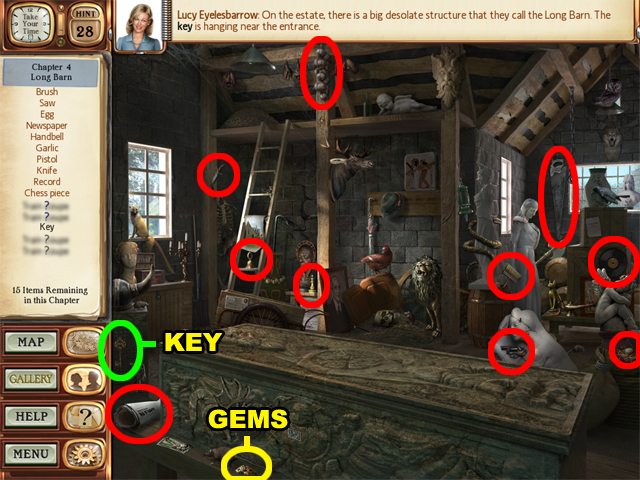
- Collect the KEY above the lower left corner.
- Collect the GEMS to the right of the lower left corner.
- Be sure to collect all of the normal items before trying to move on.
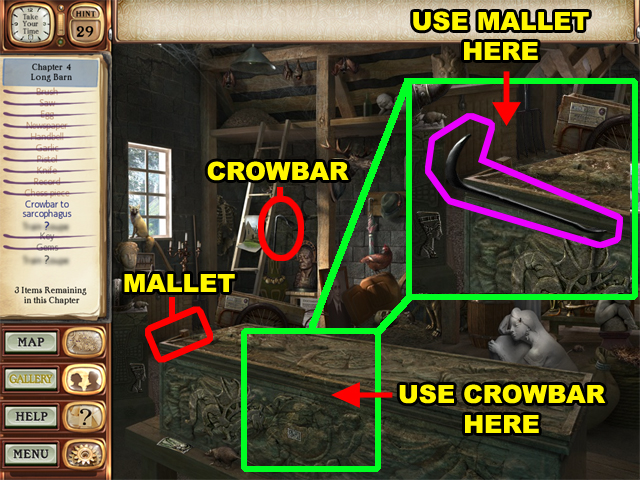
- Use the CROWBAR on the SARCOPHAGUS below the center of this scene.
- Use the MALLET on the CROWBAR to open the SARCOPHAGUS.
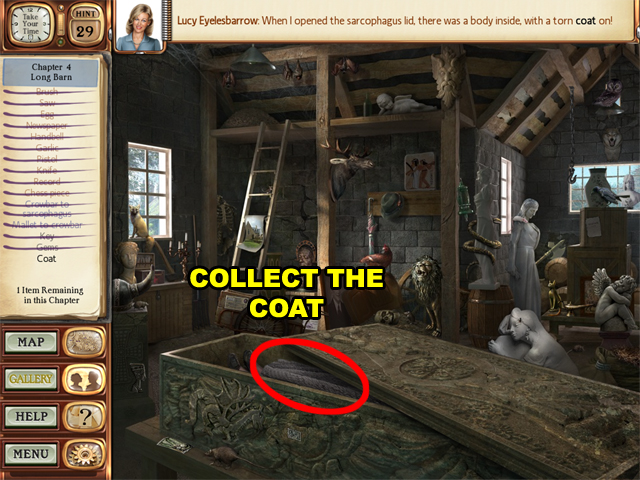
- Collect the COAT in the sarcophagus.
Clue Matching
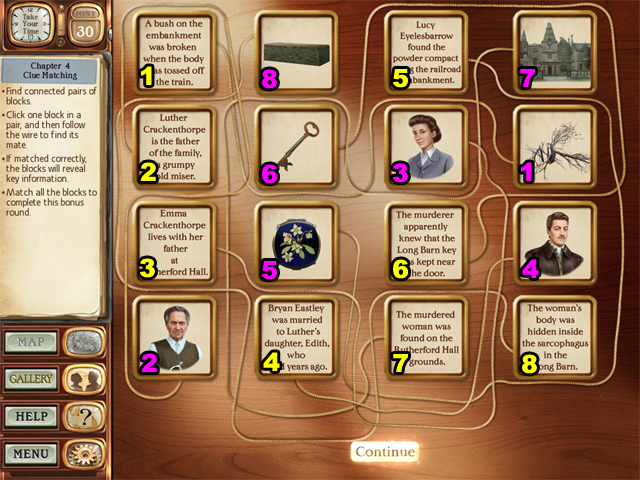
- Pair the blocks with matching numbers to complete this chapter.
Chapter Five
World Map
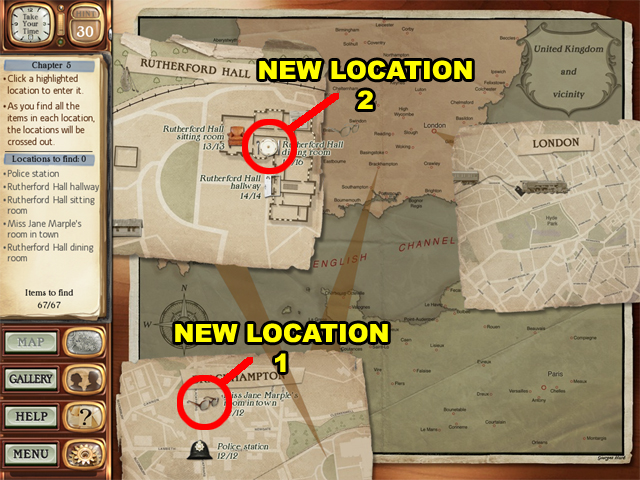
- Find the new locations on the Brackhampton and Rutherford Hall maps.
- Enter the Police Station location first.
Police Station

- Collect the PLANE in the upper right corner.
- Collect the FRUITS in the center of this scene afterwards.
- Enter the Rutherford Hall Hallway after this scene is complete.
Rutherford Hall Hallway
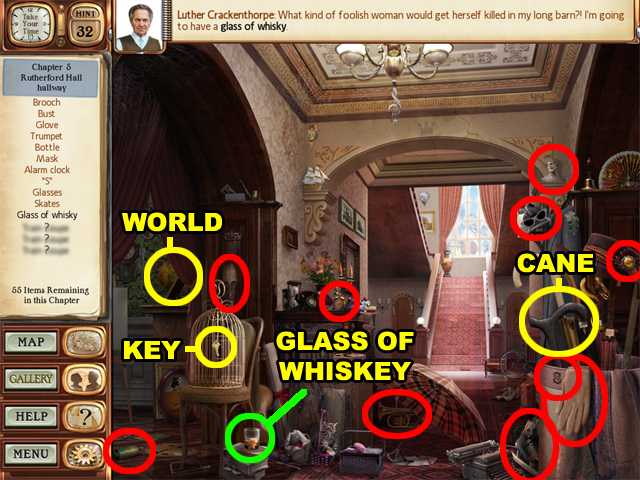
- Collect the GLASS OF WHISKEY near the lower left corner.
- Collect the CANE above the lower right corner next.
- Collect the WORLD above the lower left corner.
- Collect the KEY on the birdcage near the lower left corner.
- Visit the Rutherford Hall Sitting Room after completion.
Rutherford Hall Sitting Room
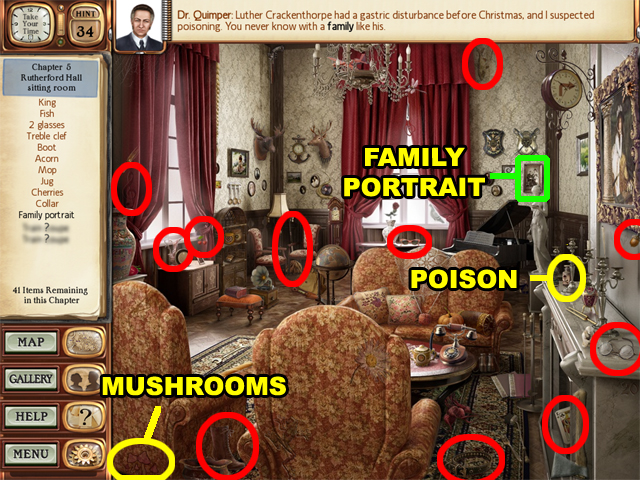
- Collect the FAMILY PORTRAIT above the piano.
- Collect the MUSHROOMS in the lower left corner afterwards.
- Collect the POISON on the fireplace.
- Enter Miss Jane Marple’s Room in Town afterwards.
Miss Jane Marple’s Room In Town
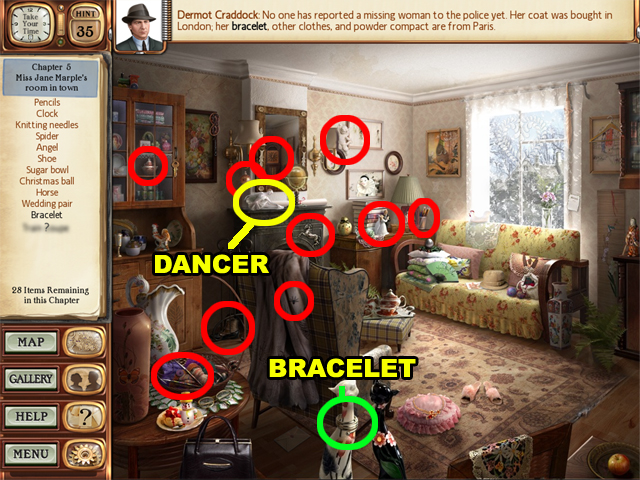
- Collect the BRACELET on the white cat at the bottom of this scene.
- Collect the DANCER on the fireplace afterwards.
- Go to Rutherford Hall Dining Room after this scene is complete.
Rutherford Hall Dining Room
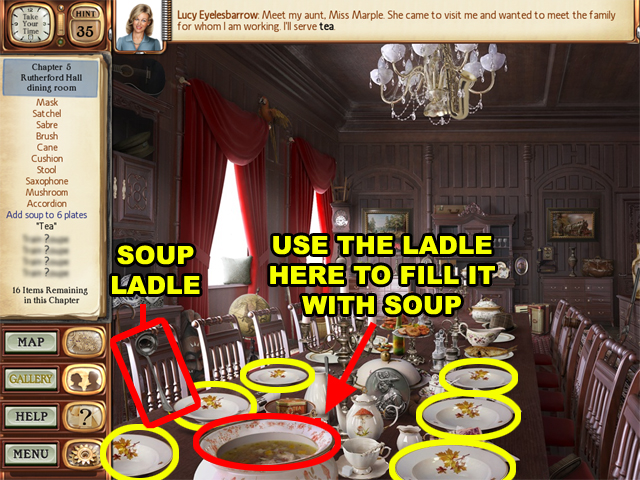
- Use the SOUP LADLE to take soup out of the soup container. Both of these items are located near the lower left corner.
- Then use the filled SOUP LADLE to pour soup into an empty plate. The empty plates are highlighted in yellow.
- Repeat this process until all 6 plates are filled with soup.
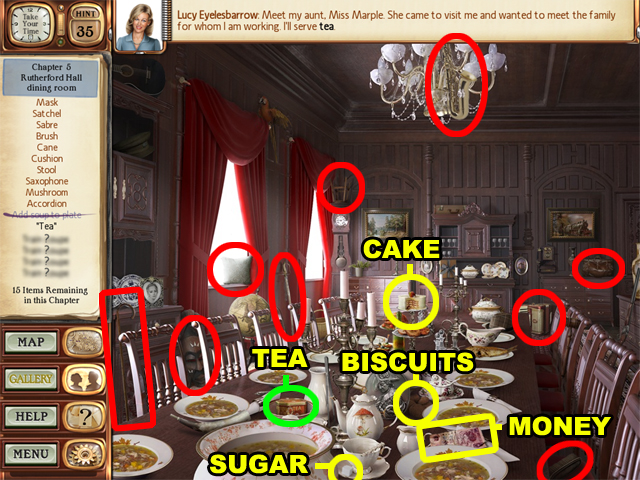
- Collect the TEA above the soup container.
- Collect the CAKE in the center of this scene.
- Collect the BISCUITS below the center of this scene.
- Collect the SUGAR at the bottom of this scene.
- Collect the MONEY in the lower right corner.
Find The Poison
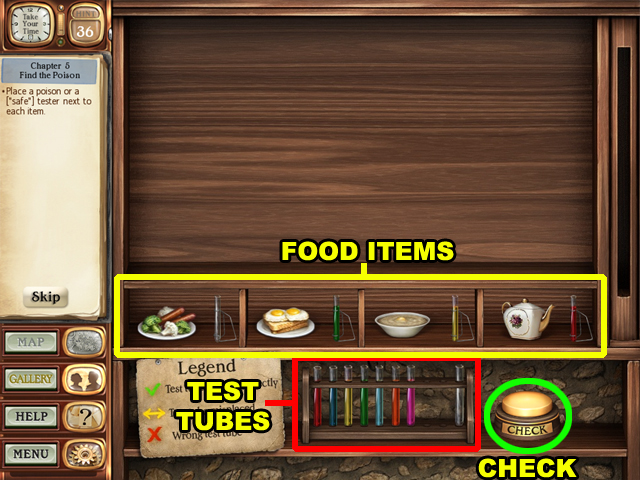
- Place the test tubes beside their correct food to complete this puzzle.
- After a tube has been placed beside each food item, click on the “check” button to see if you guessed correctly.
- Afterwards a sign will appear by each of the food items with a special indication.
- A checkmark means that you guessed correctly. A two-way arrow means that the tube belongs to different food item. And an “X” means that the test tube does not belong to any of the food items.
- The solution for this puzzle is always random.
Chapter Six
World Map
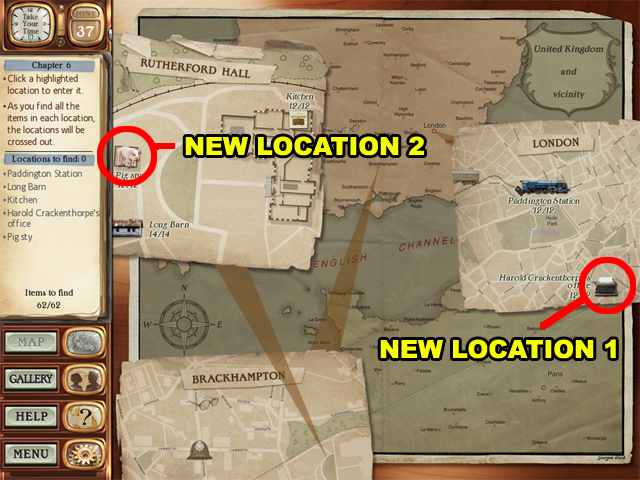
- Find the new locations on the London and Rutherford Hall maps.
- Visit the Paddington Station first.
Paddington Station
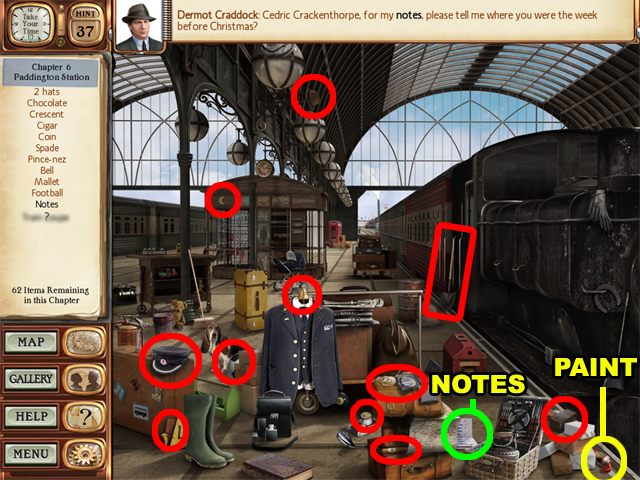
- Collect the NOTES to the left of the lower right corner.
- Collect the PAINT in the lower right corner.
- Visit the Long Barn location next.
Long Barn
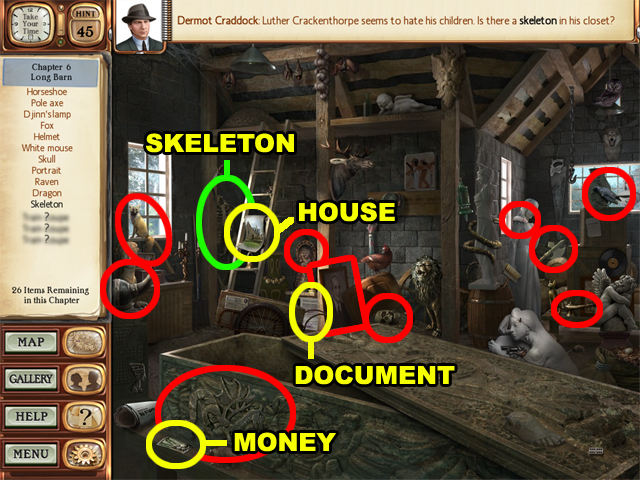
- Collect the SKELETON beside the ladder.
- Collect the MONEY in the lower left corner.
- Collect the HOUSE on the ladder.
- Collect the DOCUMENT to the left of the center of this scene.
- Go to the Pig Sty location afterwards.
Pig Sty
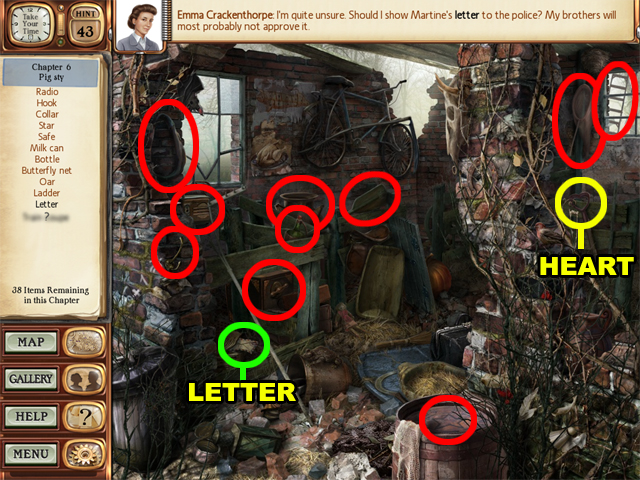
- Collect the LETTER near the lower left corner.
- Collect the HEART below the upper right corner.
- Head to Harold Crakenthorpe’s Office afterwards.
Harold Crackenthorpe’s Office
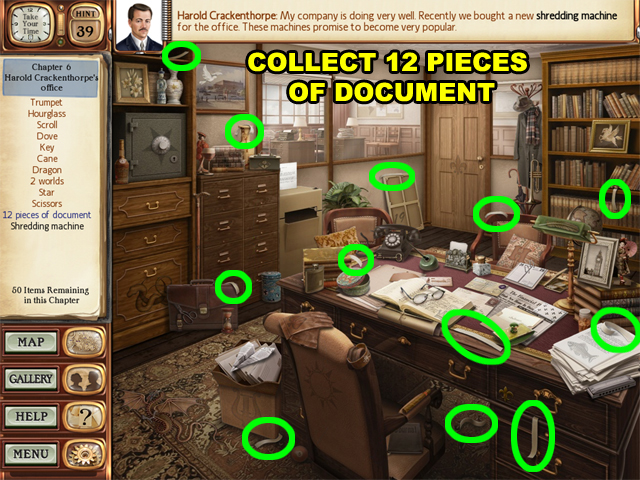
- Collect the 12 PIECES OF DOCUMENT highlighted in green.
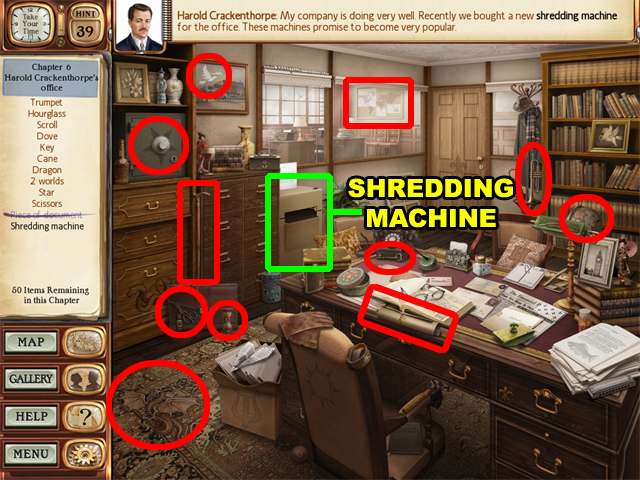
- Collect the SHREDDING MACHINE beside the filing cabinet.
- Enter the Kitchen location afterwards.
Kitchen
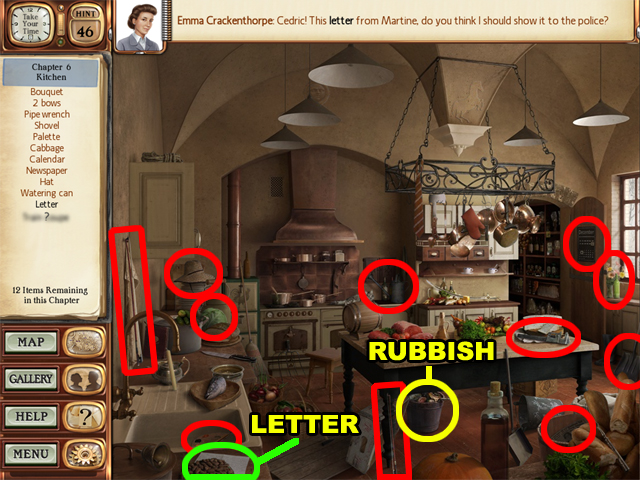
- Collect the LETTER in the lower left corner.
- Collect the RUBBISH under the table.
Shredded Paper
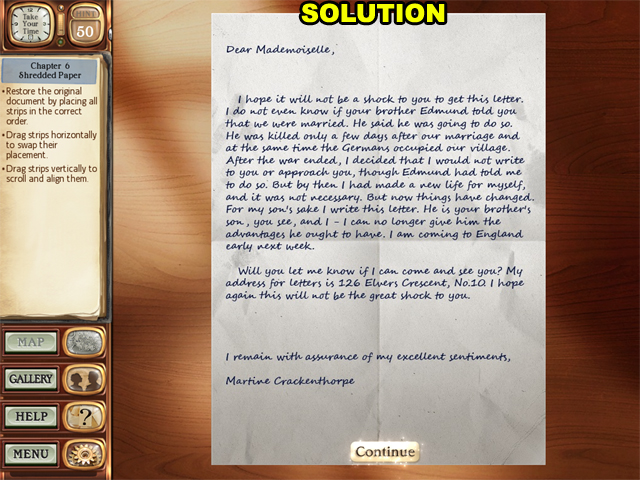
- Align the strips of paper (both vertically and horizontally) until the document is complete.
- Drag the strips upwards and downwards to adjust them vertically or left and right to adjust them horizontally.
- When a strip is in its correct position it will darken and lock into place.
- The first few lines of the letter are as follows:
Dear Mademoiselle,
I hope it will not be a shock to you to get this letter.
I do not even know if your brother Edmund told you
that we were married. He said he was going to do so.
- It is best to align the strips from left to right. Beginning with the word “Dear” is the best option.
Chapter Seven
World Map
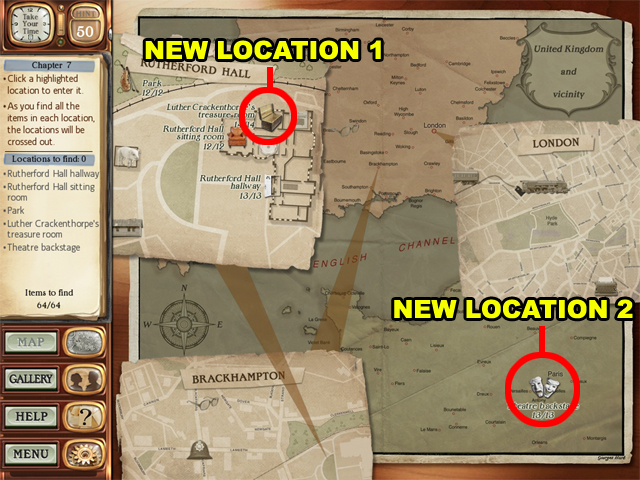
- Find the new locations on the World and Rutherford Hall maps. The location on the World map is located in the lower right corner.
- Enter the Rutherford Hall Hallway first.
Rutherford Hall Hallway
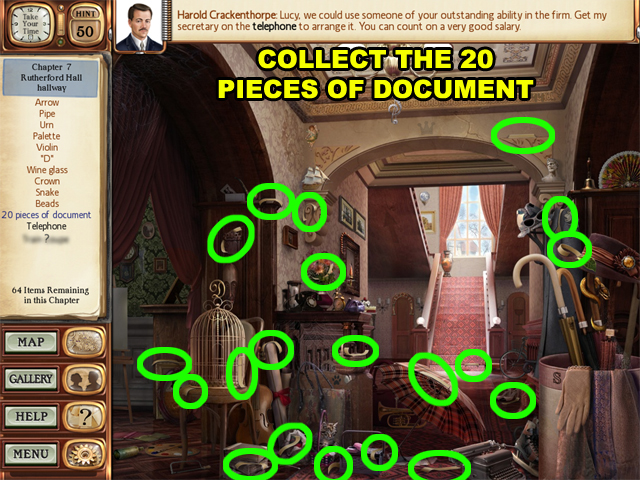
- Collect the 20 PIECES OF DOCUMENT highlighted in green.
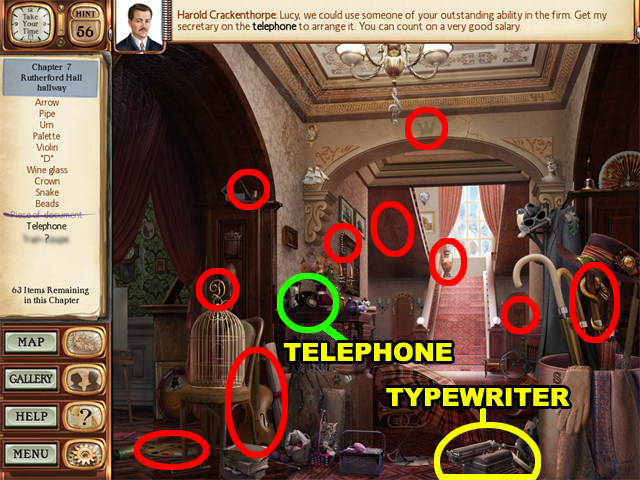
- Collect the TELEPHONE on the table near the center of this scene.
- Collect the TYPEWRITER near the lower right corner.
- Afterwards, go to the Rutherford Hall Sitting Room.
Rutherford Hall Sitting Room
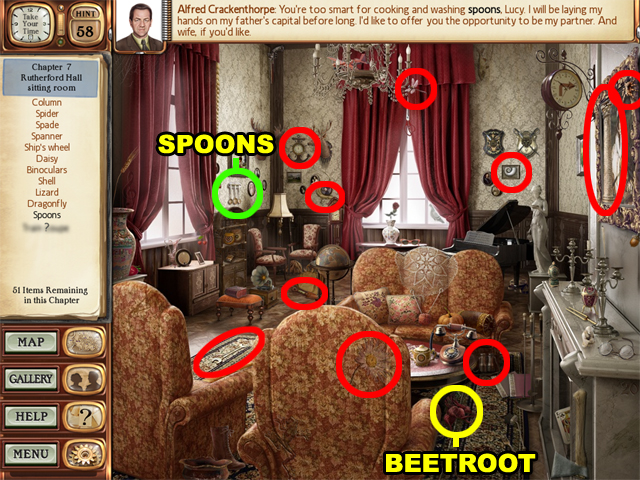
- Collect the SPOONS on the wall beside the left window in the room.
- Collect the BEETROOT under the coffee table.
- Visit the Park location next.
Park
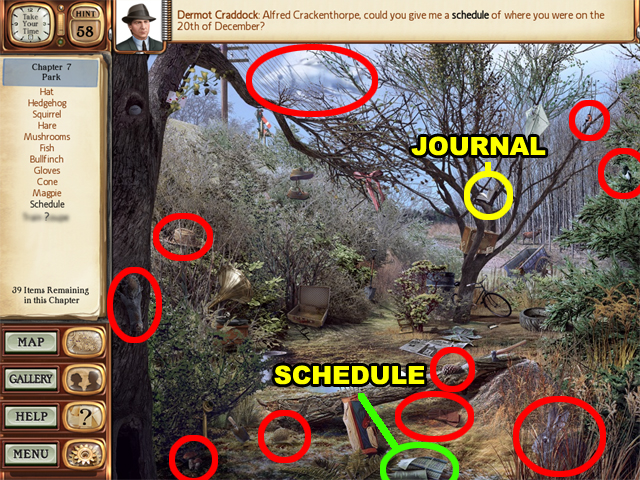
- Collect the SCHEDULE at the bottom of this scene.
- Collect the JOURNAL in the tree near the center of this scene.
- Visit Luther Crackenthorpe’s Treasure Room next.
Luther Crackenthorpe’s Treasure Room
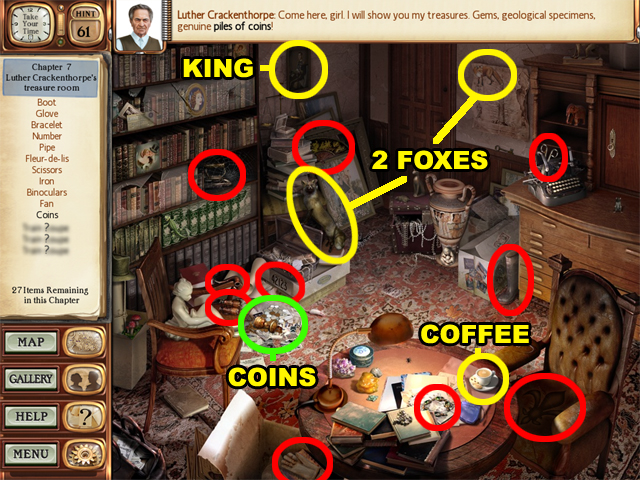
- Collect the COINS to the left of the table.
- Collect the KING to the right of the bookcase.
- Collect the 2 FOXES next. One is above the center, and the other is to the left the center of this room.
- Collect the COFFEE on the table.
- Enter the Theatre Backstage afterwards.
Theatre Backstage
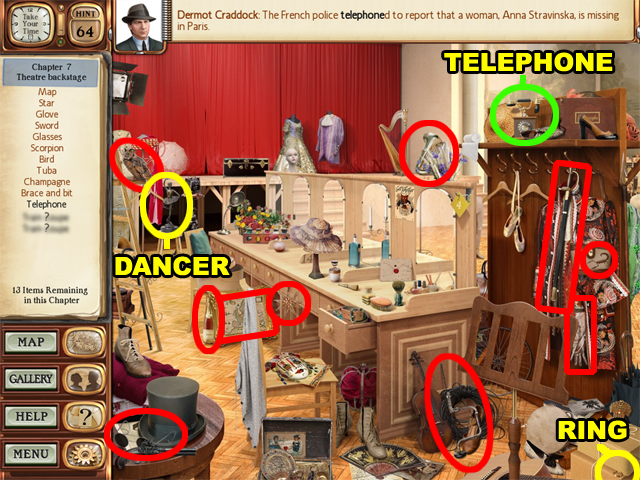
- Collect the TELEPHONE near the upper right corner.
- Collect the DANCER below the upper left corner.
- Collect the RING in the lower right corner.
Shredded Paper
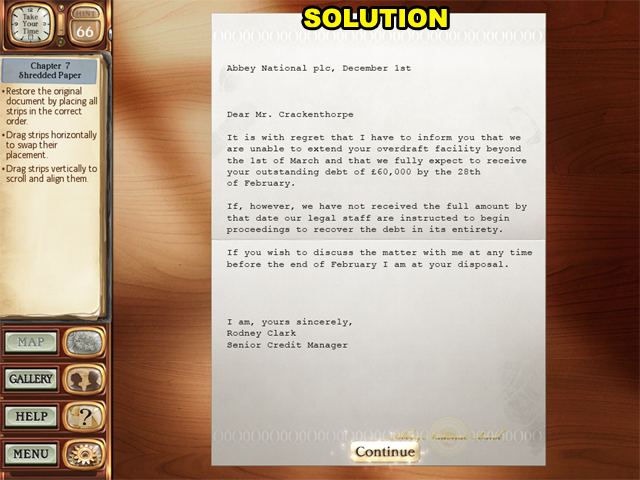
- Align the strips of the document correctly to complete this puzzle.
- The first few lines are as follows:
Abbey National plc, December 1st
Dear Mr. Crackenthorpe
It is with regret that I have to inform you that we
are unable to extend your overdraft facility beyond
the 1st of March and that we fully expect to receive
your outstanding debt of $60,000 by the 28th
of February.
- It is best to align the strips from left to right starting with the word “Abbey”.
Chapter Eight
Paddington Station
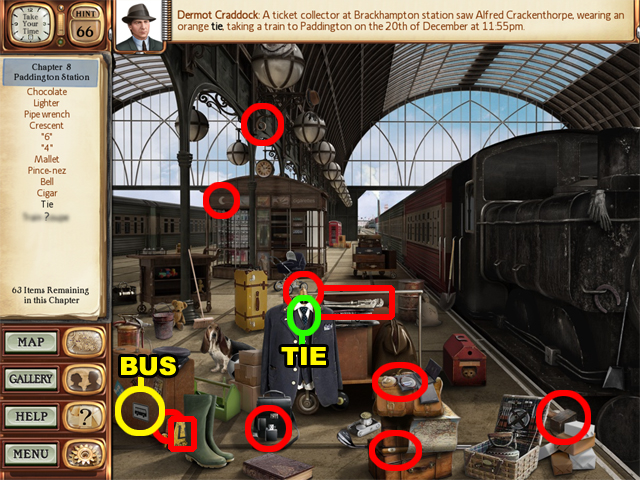
- This time there are no hidden locations, so enter Paddington Station first.
- Collect the TIE on the suit in the center of this scene.
- Collect the BUS in the lower left corner.
- Go to Harold Crackenthorpe’s Office next.
Harold Crackenthorpe’s Office
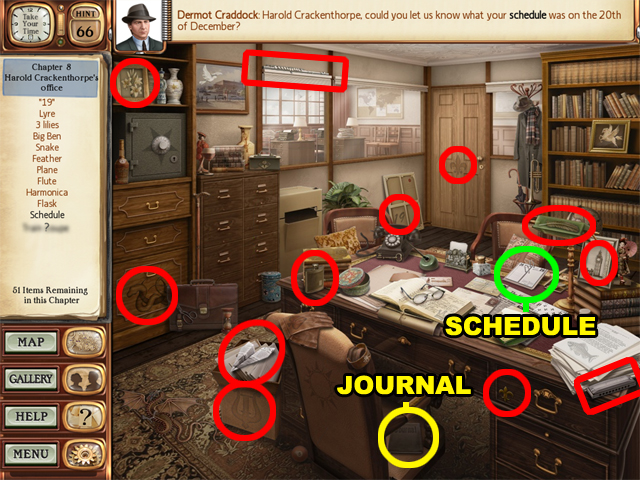
- Collect the SCHEDULE on the desk.
- Collect the JOURNAL on the chair below the desk.
- Visit the Pig Sty location afterwards.
Pig Sty
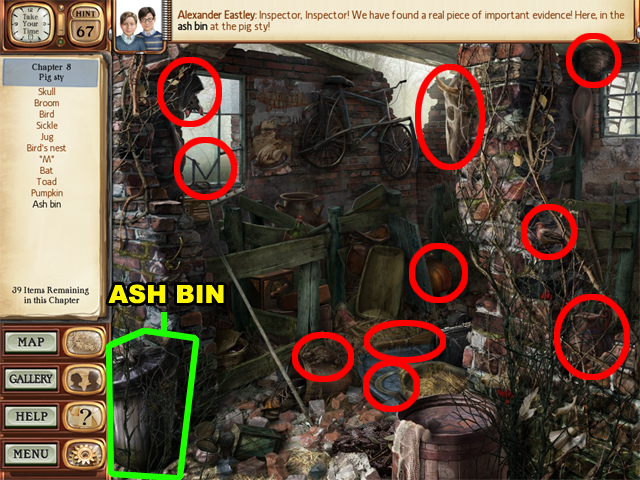
- Collect the ASH BIN in the lower left corner.
- Enter the Kitchen location next.
Kitchen
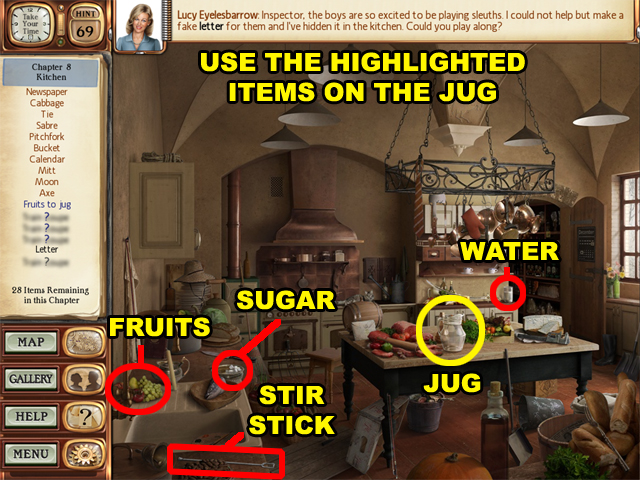
- Place the FRUITS, SUGAR, and WATER into the JUG on the table.
- The FRUITS are located above the lower left corner.
- The SUGAR is located near the lower left corner.
- The WATER is beside the door to the right of this scene.
- Afterwards, use the STIR STICK to stir the cocktail in the JUG. The STIR STICK is located in the lower left corner.
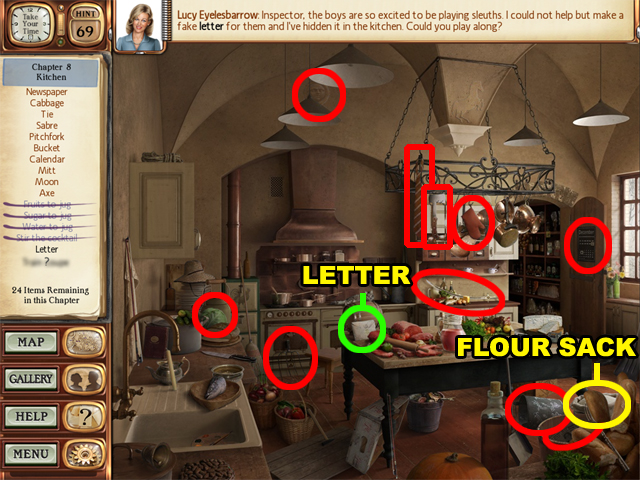
- Collect the LETTER on the table.
- Collect the FLOUR SACK above the lower right corner.
- Go to the Rutherford Hall Dining Room afterwards.
Rutherford Hall Dining Room
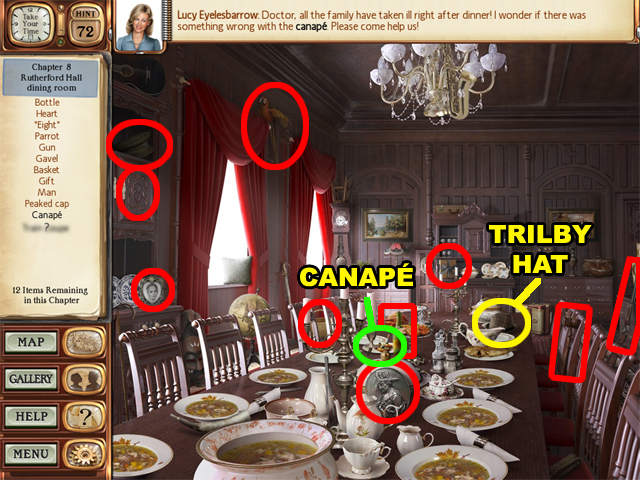
- Collect the CANAPÉ in the center of the table.
- Collect the TRILBY HAT on the table.
Rummage
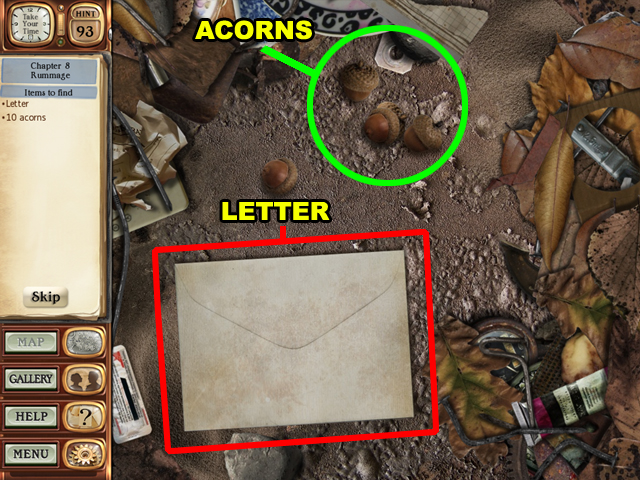
- Collect the LETTER, and 10 ACORNS to advance to the next chapter.
Chapter Nine
World Map
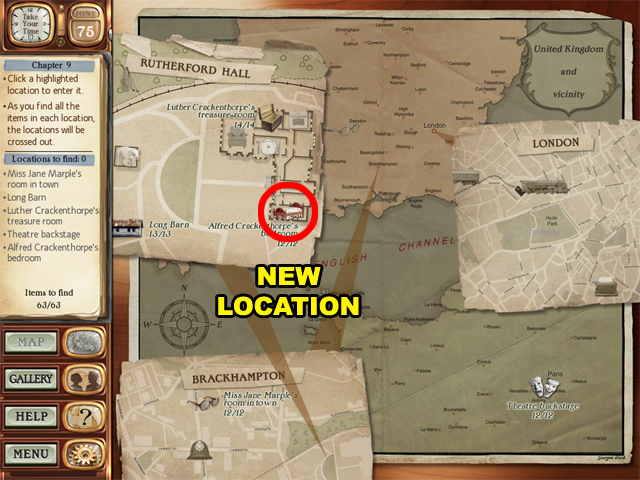
- Locate the new location on the Rutherford Hall map.
- Enter Miss Jane Marple’s Room in Town first.
Miss Jane Marple’s Room In Town
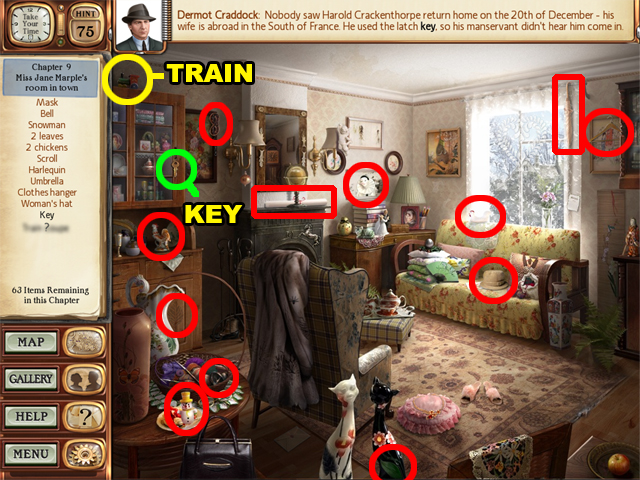
- Collect the KEY on the cupboard door.
- Collect the TRAIN in the upper left corner.
- Visit the Long Barn location next.
Long Barn
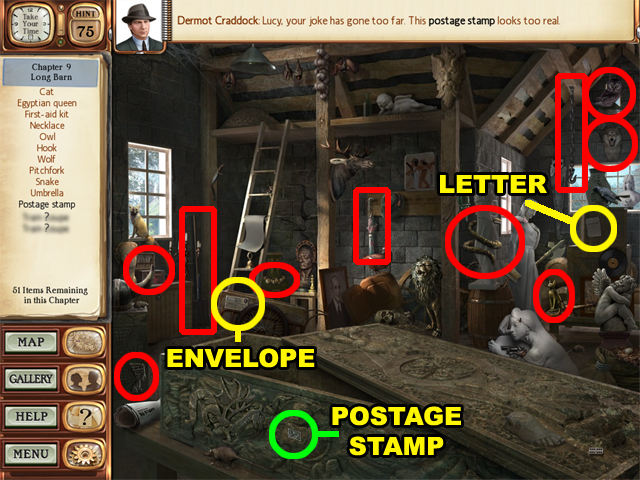
- Collect the POSTAGE STAMP on the sarcophagus.
- Collect the LETTER on the crate below the upper right corner.
- Collect the ENVELOPE below the ladder.
- Go to Luther Crackenthorpe’s Treasure Room afterwards.
Luther Crackenthorpe’s Treasure Room
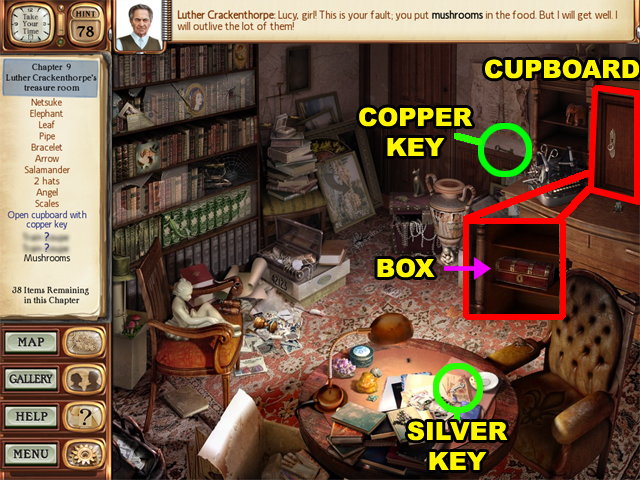
- Use the BRONZE KEY to open the CUPBOARD and reveal the box inside.
- Use the SILVER KEY to open the BOX in the CUPBOARD.
- Collect the GOLD SOVEREIGNS in the BOX.
- The BRONZE KEY is beside the room door, and the SILVER KEY is on the table.
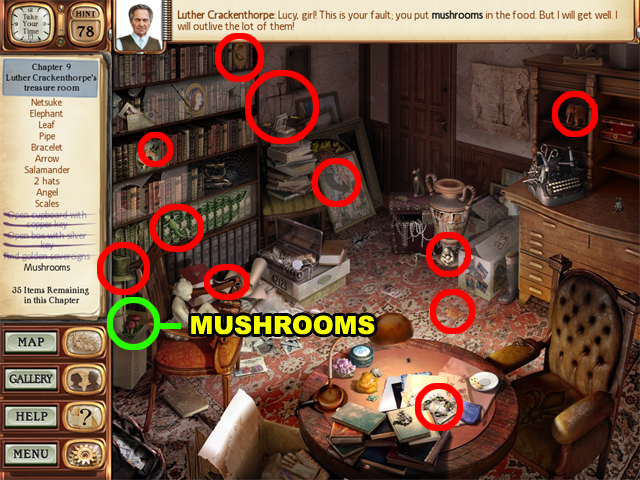
- Collect the MUSHROOMS above the lower left corner.
- Enter the Theatre Backstage location next.
Theatre Backstage
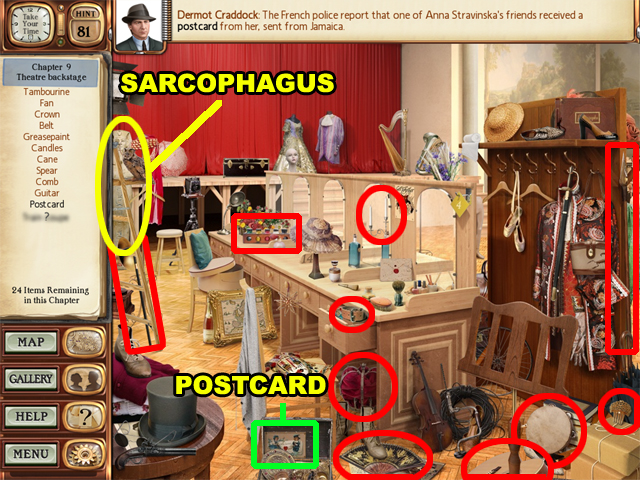
- Collect the POSTCARD to the right of the lower left corner.
- Collect the SARCOPHAGUS below the upper left corner.
- Go to Alfred Crackenthorpe’s Bedroom.
Alfred Crackenthorpe’s Bedroom
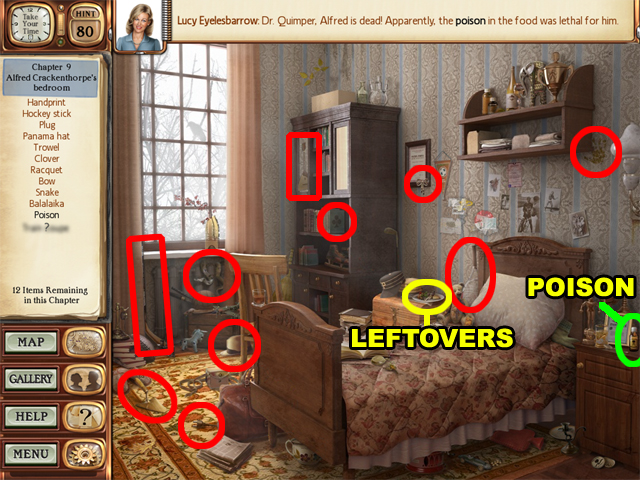
- Collect the POISON on the nightstand.
- Collect the LEFTOVERS on the chest beside the bed.
- Afterwards complete the “Find the Poison” puzzle to complete this chapter.
Chapter Ten
Train Carriage
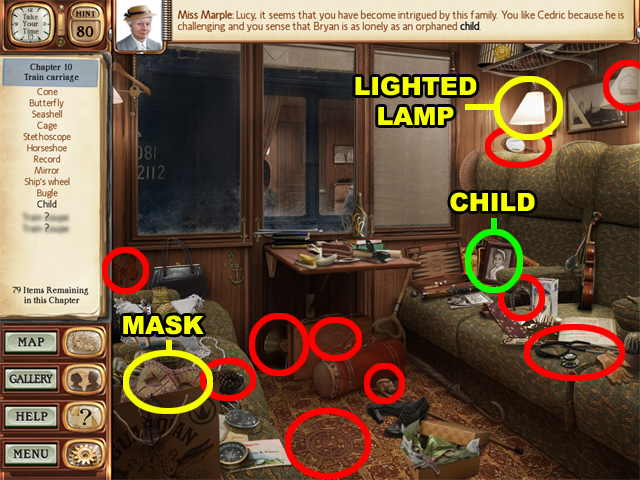
- There are no hidden locations to find on the World map, so enter the Train Carriage scene first.
- Collect the CHILD to the right of the center of this scene.
- Collect the LIGHTED LAMP near the upper right corner.
- Collect the MASK above the lower left corner.
- Go to Harold Crackenthorpe’s Office.
Harold Crackenthorpe’s Office
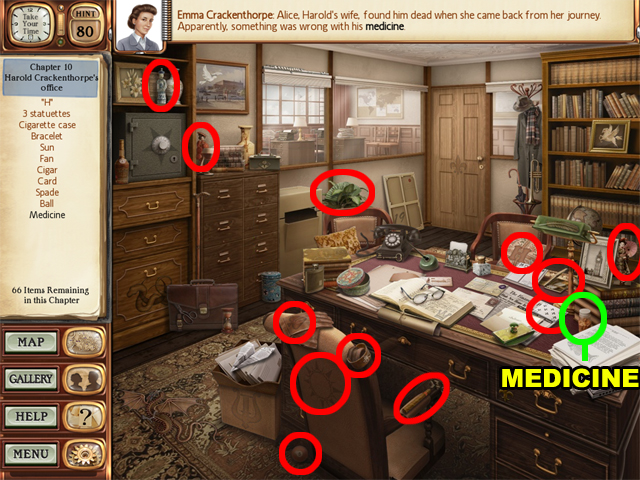
- Collect the MEDICINE on the desk above the lower right corner.
- Visit the Police Station next.
Police Station
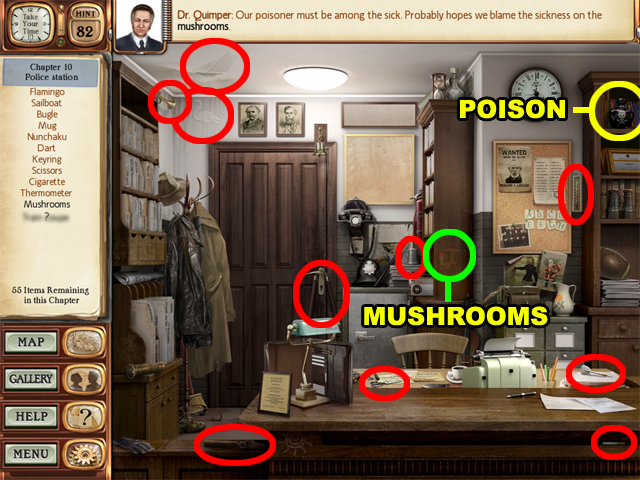
- Collect the MUSHROOMS on the bookcase near the center of this scene.
- Collect the POISON in the upper right corner.
- Go to the Pig Sty location afterwards.
Pig Sty
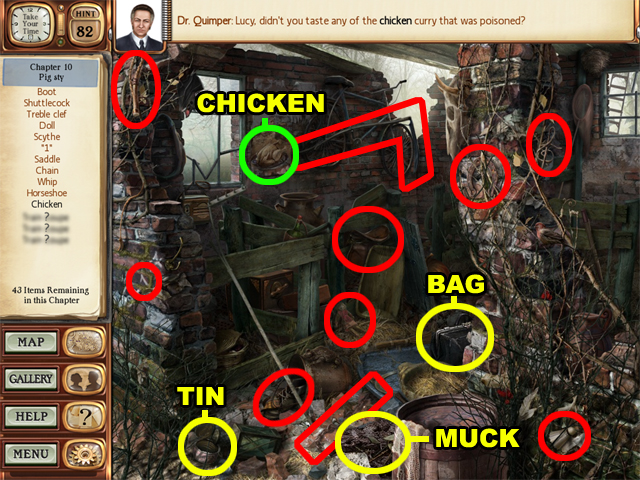
- Collect the CHICKEN by the window to the left of the room.
- Collect the TIN in the lower left corner.
- Collect the BAG below the center of this scene.
- Collect the MUCK beside the barrel at the bottom of this scene.
- Go to Rutherford Hall Sitting Room next.
Rutherford Hall Sitting Room
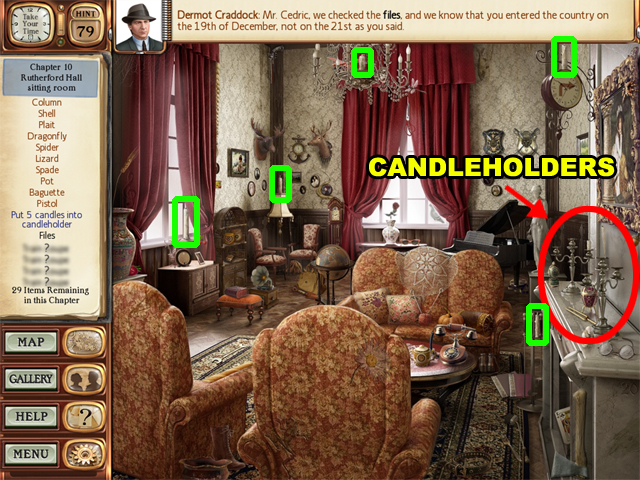
- Place the 5 CANDLES into the 2 CANDLEHOLDERS on the fireplace. The CANDLES are highlighted in green.
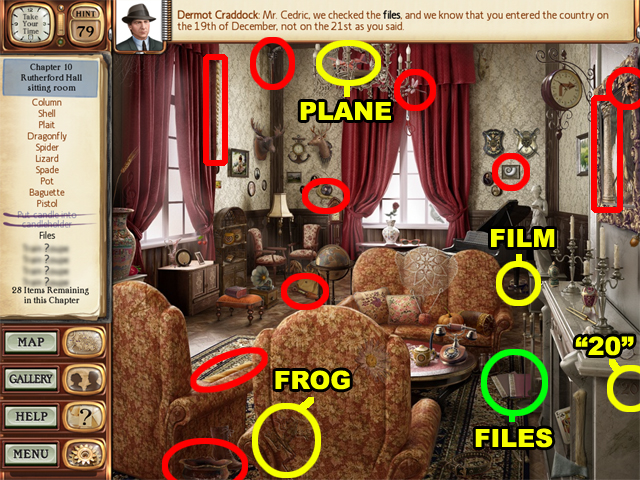
- Collect the FILES beside the fireplace.
- Collect the PLANE on the chandelier at the top of this scene.
- Collect the “20” above the lower right corner.
- Collect the FILM below the piano.
- Collect the FROG on the back of the chair.
- Head to the Park location next.
Park
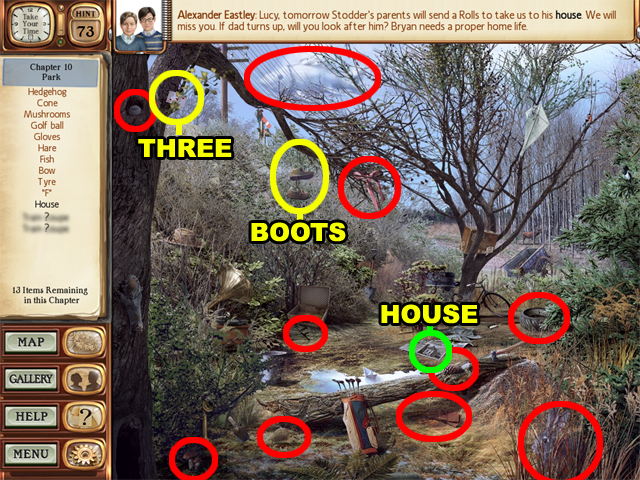
- Collect the HOUSE near the center of this scene.
- Collect the BOOTS hanging on the branch of the left tree.
- Collect the THREE in the upper left corner.
- Afterwards is another “Find the Poison” puzzle. Complete it to conclude this chapter.
Chapter Eleven
Miss Jane Maple’s Room In Town
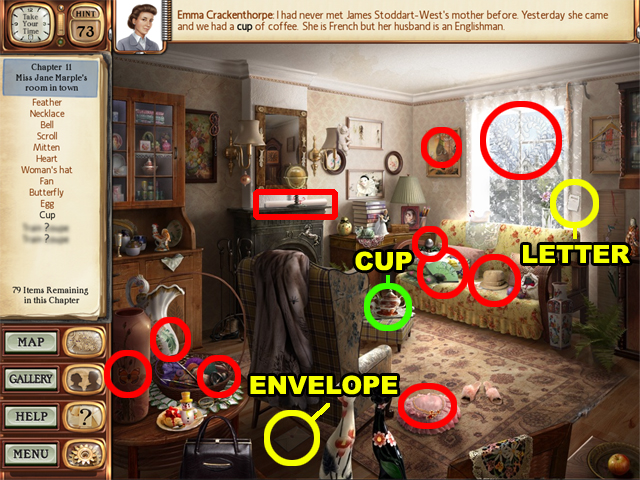
- There are no hidden locations yet, so enter Miss Jane Marple’s Room in Town first.
- Collect CUP in the center of the room.
- Collect the ENVELOPE below the chair.
- Collect the LETTER beside the window.
- Go to the Rutherford Hall Hallway next.
Rutherford Hall Hallway
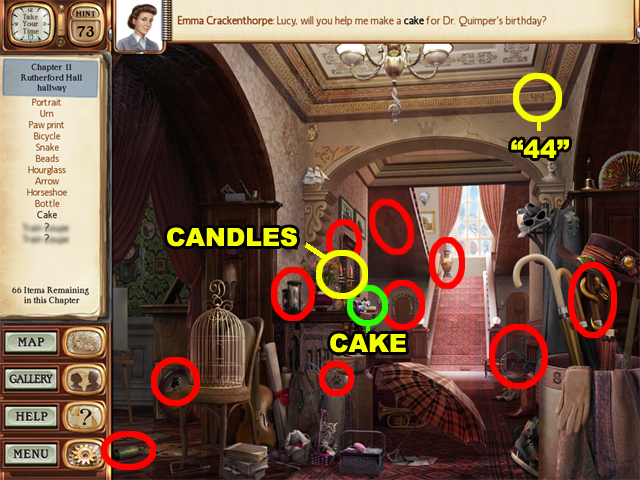
- Collect the CAKE near the center of this scene.
- Collect the CANDLES near the center of this scene.
- Collect the “44” by the upper right corner.
- Head to Alfred Crackenthorpe’s Bedroom afterwards.
Alfred Crackenthorpe’s Bedroom
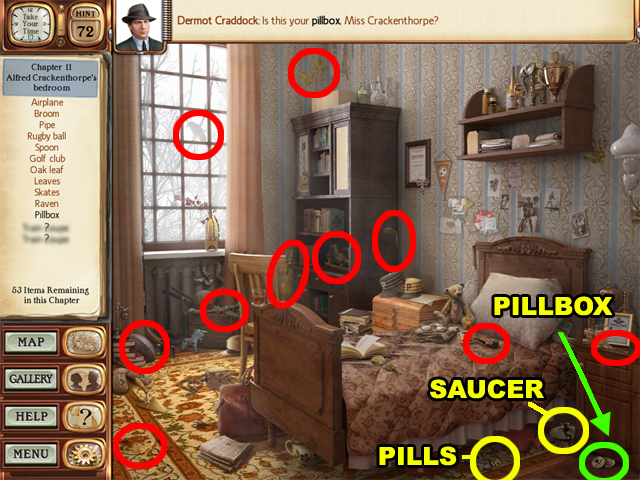
- Collect the PILLBOX in the lower right corner.
- Collect the SAUCER in the lower right corner.
- Collect the PILLS under the bed afterwards.
- Visit the Theatre Backstage location.
Theatre Backstage
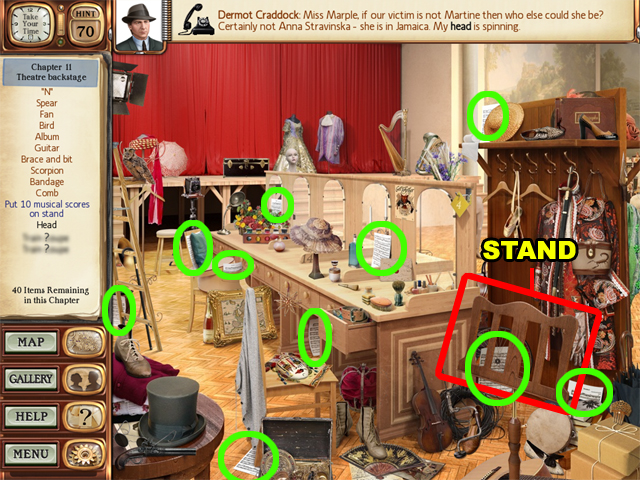
- Place the 10 MUSICAL SCORES (highlighted in green) onto the STAND.
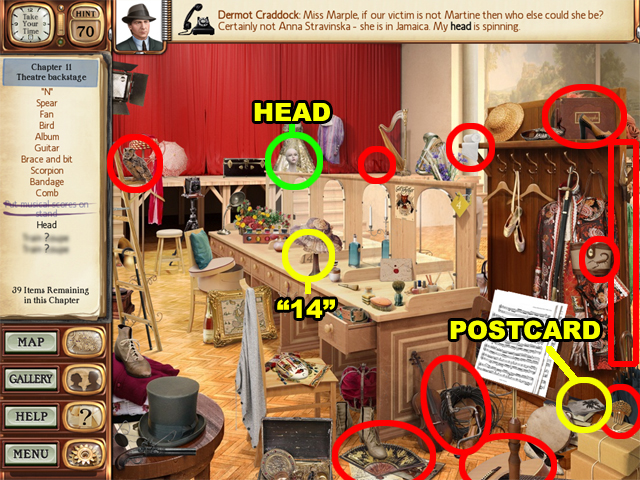
- Collect the HEAD by the stage curtain.
- Collect the POSTCARD above the lower right corner.
- Collect the “14” to the left of the center of this scene.
- Go to Miss Jane Marple’s Sitting Room next.
Miss Jane Marple’s Sitting Room
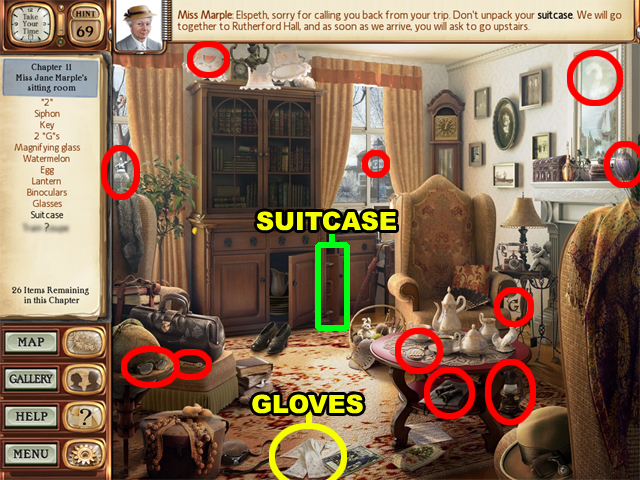
- Collect the SUITCASE below the window in the center of this scene.
- Collect the GLOVES at the bottom of this scene.
Clue Matching
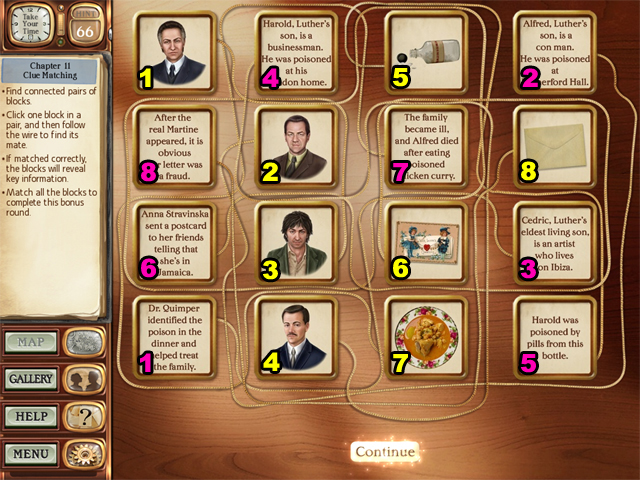
- Pair the blocks that are labeled with matching numbers.
- Afterwards the Rutherford Hall Dining Room will become active again; enter it.
Rutherford Hall Dining Room
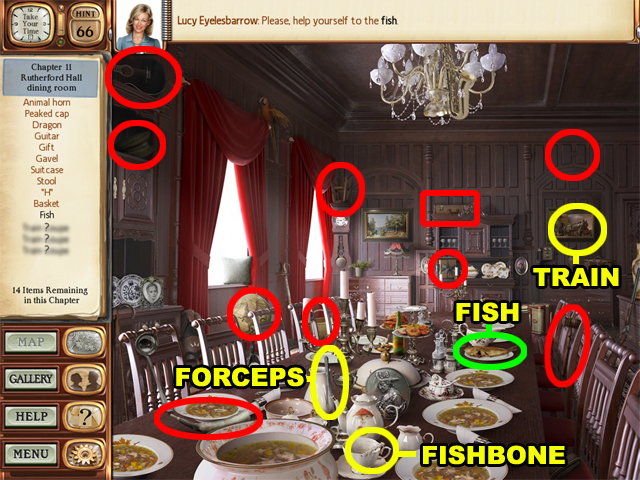
- Collect the FISH on the table.
- Collect the FISHBONE in the cup on the table.
- Collect the FORCEPS near the soup container.
- And lastly, collect the TRAIN below the upper right corner.
- Enjoy finding out whodunit!


0 comments:
Post a Comment