


WALKTHROUGH

INTRODUCTION
Pick up the 2 flints marked in yellow. Pick up the 5 loose sticks marked in green.Pick up the tinder marked in orange. Place the 5 loose sticks, tinder and flint, in that order, in the middle of the ground.

CHAPTER 1 - HOME -
Click on the computer monitor, then click on the New Mail envelope on the computer monitor.You need the password.Click down to exit the screen, triggering a Hidden Object Scene. The Paper Scrap will be added in inventory. Add the Paper Scrap to the scrap in the lower left edge of the computer monitor to complete the code. Key 8-4-6-2-7-9-0 into the keypad and press enter.


Exit out of that view to enter in the Living Room. Pick up the scissors in the lower right. Pick up camera part 1/5 on the couch. Go trough the door. Pick up camera part 2/5 on the dresser. Go trough the door to enter the garage.


Play the Hidden Object Scene by the shelves. The breaker box key will be added to inventory. Pick up camera part 3/5 on the stepladder. Open the washing machine and pick up map piece 1/12. Unlock the cabinet above the washer with the breaker box key. You need a bulb. Go back to the Living Room. Play the Hidden Object Scene to obtain the light bulb.


Go back to the Garage.Zoom into the panel above the washing machine. Insert the light bulb in the empty spot on the breaker. Click on the bulbs in the order shown on the screen shot to light them all. This action turns on the lights in the Dark Room. Exit the Garage and enter Dark Room trough the left door.


Pick up camera part 4/5 on the counter. Grab the Attic Hook in the lower left. Pick up map piece 2/12 on the line. Play the Hidden Object Scene to obtain the Boatman. Exit the Dark Room. Attach the Attic Hook to the attic door in the upper right. Pick up map piece 3/12 that falls from the door onto the ladder. Go into the Attic. Pick up camera part 5/5 on the top of the crate. Pick up map piece 4/12 on the plane in the upper right. Pick up map piece 5/12 below the carpet on the left. Zoom into the package on the ground. Open it using the scissors. Click on the box twice and pick up the Native Idol.


Play the Hidden Object Scene in the back of the Attic. Pick up map piece 6 trough 10 (of 12) marked in yellow. Return to Living Room. Zoom into suitcase on the footstool. Place the 5 camera parts into suitcase. Click on parts to pick them up and place them. You can right-click on a part to rotate it. Arrange the camera part in the suitcase so that none of them overlap. click on the camera bag to enter into inventory. Pick up the camera keys below the camera bag. Zoom into the box on the dresser.


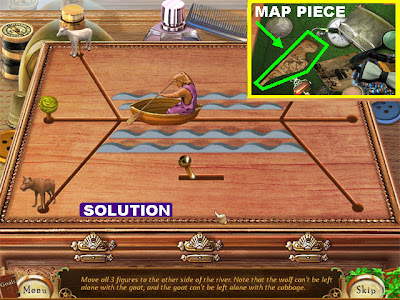
Place the boatman on the puzzle. You must move the 3 figures to the opposite side of the river, following the rules described in the game. Use the lever to move the items and the boat. follow this steps to solve the puzzle:
Click on the goat to place it in the boat. click on the lever to move the boat to the left side. the goat will be dropped off as soon as is reaches the opposite shore. Send the boat back to the right side by clicking on the lever. Pick up the cabbage and drop it to the left side on the river. Place the goat back into the boat before you leave. Take the boat back to the right and drop off the goat. Place the wolf on the boat and drop it on the left side on the river. Take the boat back to the right side. Pick up the goat and take it to the left side of the river to complete the puzzle. Move the items out of the way and pick up map piece 11/12. go to the Garage.
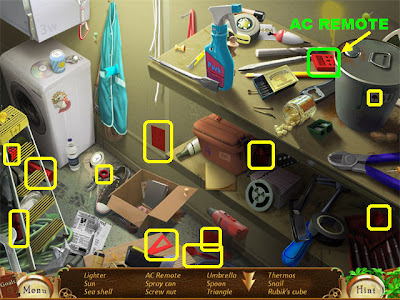
Play the Hidden Object game to obtain the Ac Remote. return to the Living Room. Zoom into the air conditioner in the upper left. Place the Ac Remote on the air conditioner, pick up map piece 12/12 that falls on top of the pillow on the floor. Return to the Attic. Zoom into the table of the far left. Place the 12 map pieces on the table. Assemble the map according to the image on the sceenshot using the instructions given in the game. Click on the map to enter into inventory. Return to the Garage. Open the car trunk with the car keys. Place the map,Native Idol and Camera Bag in the trunk. Close the trunk. exit trough the door to end the chapter.


CHAPTER 2 - HANGAR -
The Native idol will be in inventory at the beginning of the chapter. Open the airplane door and enter the cockpit to trigger a Hidden Object Scene outside. Exit the cockpit. Play the Hidden Object Scene, in the lower right, to obtain the Sponge. Clean the plane's wing with the Wet Sponge until the blue, yellow, green, white, red and black stripes appear on it. Zoom into the panel by the far right door. Click on the panel colors in the following order: blue, yellow, green, white, red and black. The numbers 826354 will appear on the panel; press "ent"; click on the handle to open the door.


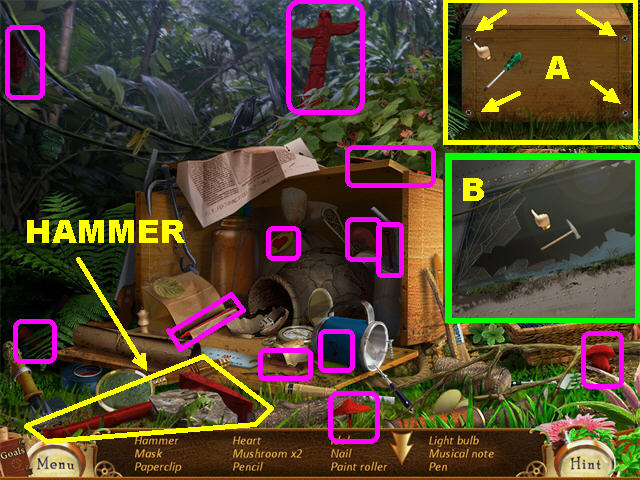
Play the Hidden Object Scene to obtain the Oilcan. The 3 Ladybugs are circled in yellow. The 2 ring are circled in red. Exit the scene. Play the Hidden Object scene in the lower right to obtain the Hammer. The 5 flies are marked in red. Go back to the Office. Click on the keys in the upper right and they will fall into the large vase. Break the large vase with the Hammer to trigger a puzzle. Find the 13 keys. The safe's key will be added in inventory.


Click on the file cabinets to trigger a puzzle. Click the drawers in the order show to solve the puzzle. Zoom into the drawer on the right and pick up the Flashlight. Click on the painting in the upper right to make it fall, revealing a safe. Zoom into the safe. Place the safe's keys on the safe to trigger a puzzle. Place the keys into the correct locks. If you make 4 incorrect choices, the keys will shuffle themselves. Right-click on a key to drop it back down. Pick up the fuse inside the safe. Exit the scene.


Play the Hidden Object Scene in the lower right to obtain the Valve. The 5 handprints are marked in red. Go down the steps in the lower left corner. Turn on the lamp in the upper left. Zoom into the vice grip on the table. remove the rust with the oil cane on the 4 spots. Open the cabinet in the lower left and pick up the Empty Gas Can. Pick up the Door Lever on the vice grip after the rust has been removed. Place the valve on the thank. Put the Empty Gas Can below the Valve; click on the valve to create the full gas can. Click on the Hidden Object scene in the lower right. Place the Flashlight anywhere on the scene to illuminate it. The Arrow will be added to inventory. Exit the scene.


Zoom into the winch control (A) hanging on the left. Place the Arrow on the winch control. Click on the green Arrow to drop the wheel on the ground. Pick it up. Zoom into the hangar gate control (B), place the door lever (C) on the panel and click on it to open the door. Place the wheel on the jack below the plane. Open the plane's gas tank (D) and insert the full gas can. Zoom into the cockpit (E), place the fuse (F) in the control panel. Click on the key (G) to start the engine.

CHAPTER 3 - JUNGLE -
Pick up the glasses in the upper right to bring the scene in focus. Click down. Pick up the long fiber on the right strap by clicking it 3 times. Open the pocket, pick up the magnet inside the pocket to attach it to the fiber. Click upwards. Place the magnet on the crate to trigger a Hidden Object Scene. Play Hidden Object Scene to obtain the knife. Click down. Cut the right strap with the knife 3 times. Go towards the bridge on the right. Play Hidden Object Scene. The 5 gears are marked in yellow and will be added to inventory. Zoom into the mechanism on the lower left.


Place the gears from inventory to board. Drag the Gears to the appropriate pegs. Click on the lever on the left to spin the gears and lower the bridge. Cross the bridge. Play the Hidden Object Scene to obtain the screwdriver. click down twice. Zoom into the craft on left. Use the screwdriver (A) on each of the 4 screws to trigger a Hidden Object Scene. The hammer will be added to inventory. Cross the bridge and zoom into the plane. Hit the glass with the hammer (B) 3 time to break it. Enter the plane and extinguish the fire. Exit the plane.


Unravel the ropes by clicking on the one rope from the group that runs from the top to the bottom of the screen. Make your selection by clicking on one of the 3 choices on top. When you make a right selection, the next set of ropes will appear.If you make a mistake a red light will flash and the puzzle will be reset. You must complete 5 rounds of this puzzle. The rope will be added to inventory after the puzzle has been completed. Exit the plane and click down twice.


Click on the parachute hanging from the tree. Cut a cloth patch with the scissors. Give the banana to the monkey in the upper left and he will drop the idol. Pick up the Native Idol from the ground. Play the Hidden Object Scene. The needle and thread will be added to inventory. Cross the bridge to return outside the plane. Zoom into the glider on the left and place the rope on it. Click on your cursor below the tree to get closer to the glider. Zoom into the glider to activate a puzzle. Place the cloth patch and needle and thread on the hole on the right side of the wing. Sew the wing glider by stitching a continuous line trough every hole. Click on a green hole to pass the thread trough it. Click on the glider to end the chapter.


CHAPTER 4 - WILD TRIBE -
Take a closer look at the table to view an elixir recipe. Exit out of that view. Play the Hidden Object Games in the lower left. The mortar and pestle will be added to inventory. Pick up the bowl on top of the Shaman. Leave the tent. There are 4 different exit in the scene. Go forward, towards the upper left. Play the Hidden Object Games. The Glue Pot will be added to inventory. Zoom into the boat to trigger a puzzle. Place the Glue Pot on the broken pieces at the bottom of the scene. Assemble the boat according to image.
Take a closer look at the table to view an elixir recipe. Exit out of that view. Play the Hidden Object Games in the lower left. The mortar and pestle will be added to inventory. Pick up the bowl on top of the Shaman. Leave the tent. There are 4 different exit in the scene. Go forward, towards the upper left. Play the Hidden Object Games. The Glue Pot will be added to inventory. Zoom into the boat to trigger a puzzle. Place the Glue Pot on the broken pieces at the bottom of the scene. Assemble the boat according to image.


Pick up pipe 1/5 on the beach after the boat has been repaired. click in the upper right to reach the hut. try to pick up the pipe by the man and he'll ask you for something in exchange. This action will trigger 2 separate Hidden Object Scenes. Click down twice and go towards the lower left. Play the Hidden Object Scene. The 15 berries are marked in yellow and will be added to inventory. Pick up pipe 2/5 by the round stones. Zoom into the table on the far right to activate a puzzle. Place the flowers in the correct spots using the clues on the board at the bottom, along with the chalk sketches on the main board. Grab the flower parts and attach them to the correct stems. The Therapeutic Flower will be added to inventory. Exit and proceed right into the Shaman's tent.


Play the Hidden Object Scen. The Bone will be added to inventory. go outside. Give the bone to the dog. it will drop the pipe from its mouth. Pick up pipe 3/5. Go into the cave. Pick up pipe 4/5 by the water source. Play the Hidden Object Scene. The Monkey will be added to inventory. Exit the cave and click on the far left reach to boat. Play the Hidden Object Scene in the lower left corner. The Snorkel will be added to inventory. Click in the upper right to reach the hut.


Place the SNORKEL in the water to trigger a Hidden Object Scene. The 3 FROGS are marked in white. The PEARL will be added to inventory.Place the MONKEY next to the others. Pick up PIPE 5/5 in front of the man. Place the PEARL on the set of 3 cups by the man to trigger a puzzle. You have to correctly guess where the pearl is 3 times. Each time you guess correctly, an extra cup is added. Click on the pearl to begin. The solutions are random. A GOPHER will be added to inventory after you beat the puzzle. Return to the Cave.


Zoom into the pipes below the water source. Place the 5 PIPES anywhere in the scene. Fix the pipes by placing them into the right spots. Please look at the screenshot for the solution. Click on the lever on the right, after the puzzle has been completed, to make the water flow. Place the BOWL in the water to obtain PURE WATER. Leave the cave and click in the lower left.Place the GOPHER on the right side of the ground so it can dig up the ground. Pick up the 4 ROOTS the gopher uncovered. Return to the Shaman’s Hut.


Zoom into the table on the right. Place the MORTAR AND PESTLE, BERRIES, THERAPEUTIC FLOWERS, PURE WATER, and ROOTS on the table to trigger a puzzle. Place the THERAPEUTIC FLOWER in the mortar. Click on the pestle 3 times to crush the flower. Place 1 serving of CRUSHED FLOWER from the mortar into the bowl of water; click on the spoon to stir the mixture after each additional step. Add a BERRY to the bowl; click on the spoon 2 times to stir it. Add a ROOT and a BERRY to the bowl and stir. Place a BERRY in the bowl and stir. Place the CRUSHED FLOWER in the bowl and stir; the ELIXIR will be added to inventory Give the ELIXIR to the Shaman.

CHAPTER 5 - PIRATE BAY -
Play the Hidden Object Scene. The WIRE CUTTER will be added to inventory. Use the WIRE CUTTER to cut through the barbed wire in the scene. Go forward and click in the lower right.Pick up the LANTERN at the bottom of the hut. Play the Hidden Object Scene to obtain the KNIFE. The 3 MICE are marked in white. The 3 FISH are marked in yellow. Go left. Cut the side of the tent with the KNIFE and go inside. Place the LANTERN on the table in the lower left. Click down 2 times.Play the Hidden Object Scene. The MATCHBOX will be added to inventory. Go forward and enter the tent on the left.


Light the lantern with the MATCHBOX to trigger a Hidden Object Scene. The 3 PILL BOTTLES are marked in white. The VARIETY OF PILLS will be added to inventory. Zoom into the table in the lower left; place the VARIETY OF PILLS on the table to trigger a puzzle.

Using the clues shown on the paper, you must decide to which pills they refer. Once you figure which pills belong to each description, you must click on the 6 pills that fill that description. A red “X” on the paper signals an incorrect guess. Click on the page to flip to the next one. The solutions are listed in order of appearance. The letters on the pills match the descriptions in the solution:
A - Green Triangles (Sore Throat Pills)
B - Round Blue (Headache Pills)
C - Dark Orange Triangles (Joint Ache Pills)
D - Brown Squares (Toothache Pills)
E - Brown Capsules (Earache Pills)
F - Round White Pills (Nasal Congestion Pills)
G - Red and White Capsules (Abdominal Pain Pills)
H - Green and White Pentagons (Eyes Ache Pills)
I - Orange Square (Pyretic)
J - Orange Pentagons (Vitamins)
The SLEEPING PILL will be added to inventory.
Exit the tent.

Place the SLEEPING PILL in the wine bottle so the guard will fall asleep when he drinks it. Proceed forward to the ship. Go up the ladder; zoom into the fish bowl and click on the puzzle piece the crab is holding. You need something to get the puzzle piece out. Exit this scene.Play the Hidden Object Scene to obtain the TONGS.
Go up the ladder. Zoom into the fish bowl on the left; pick up the PUZZLE PIECE with the TONGS.
Go up the ladder. Zoom into the fish bowl on the left; pick up the PUZZLE PIECE with the TONGS.


Zoom into the table on the right. Place the PUZZLE PIECE on the board to begin. Click on the gold arrows in the upper right and left sides of the puzzle to move the outer circle. Click on the blue arrows in the inner circle to move the center circle. Use the slots in the upper right to temporarily store pieces out of your way. Please look at the screenshot for the solution. The symbols should be placed as follows:
Dog, Bunny, and Cat
Three Musical Notes
Heart, Clover, and Spade
Three Chess Pieces
Footprint, Paw, and Chicken Foot
Minus, Plus, and Equal Symbols
Circle, Triangle, and Square
Dog, Bunny, and Cat
Three Musical Notes
Heart, Clover, and Spade
Three Chess Pieces
Footprint, Paw, and Chicken Foot
Minus, Plus, and Equal Symbols
Circle, Triangle, and Square

The puzzle will break apart once it has been solved. Pick up the IDOL OF WISDOM, IDOL OF JUSTICE, IDOL OF STRENGTH, IDOL OF PIU-PIU, and the PAPER SCRAP. Exit the scene and zoom into the control panel on the right.Place the PAPER SCRAP next to the one on the right. Turn off all the switches by clicking them in the correct order (as shown in the paper in the lower right). Once you press all the switches of one kind, make sure you click on the appropriate switch on the right side. Please look at the screenshot for the solution. Click on the upper right side to find Grandpa.Pick up the POP CAN on the ground; throw it inside the door to distract the man. Click on the door twice to lock it. Zoom into the table on the far left to trigger a puzzle.


Connect the wires according to the coordinates given at the bottom right side. Use the 2 wires that are connected in the panel above to solve the puzzle. Once you enter the wires correctly, the green light will appear. Please look at the screenshot for the solution. Click on the green arrow that faces downwards after all the wires are in place.Grandpa’s cage will be lowered; zoom into it. Use the IDOL OF STRENGTH on the lock. Slide the BAR to free Grandpa.Place the 5 IDOLS in the spaces with matching colors. Starting from the top, going clockwise, place the idols in the following manner: IDOL OF JUSTICE, IDOL OF STRENGTH, IDOL OF WISDOM, IDOL OF PIU-PIU, and NATIVE IDOL. Connect all the elements of the puzzle as shown in the screenshot.


0 comments:
Post a Comment