skip to main |
skip to sidebar

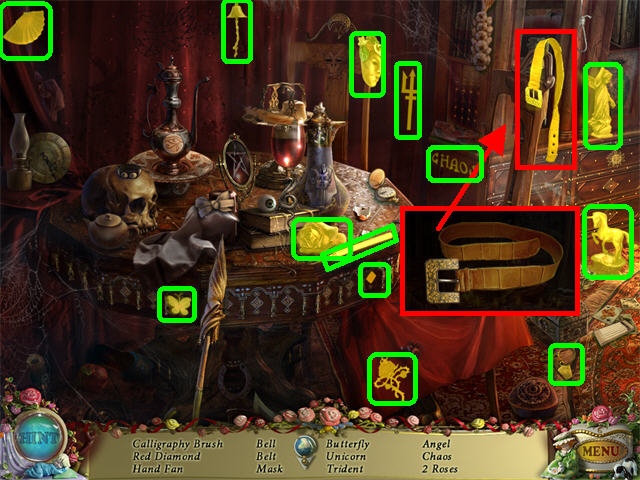
Chapter 1: Girl’s Bedroom
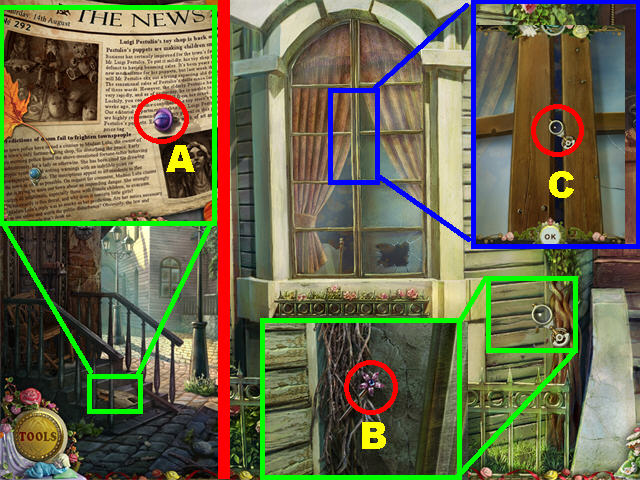
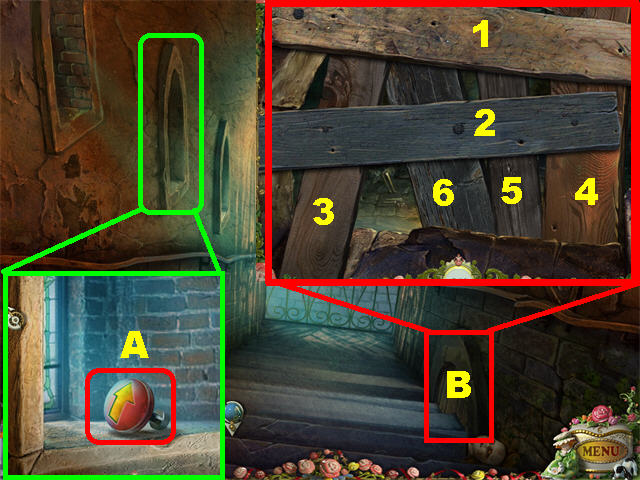
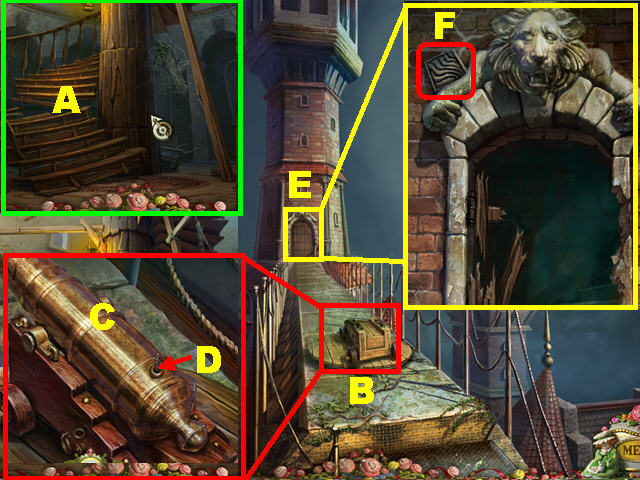
- Zoom into the newspaper in the lower left; pick up the PLANET 1/3 (A).
- Click on the door on the right for a closer look.
- Zoom into the lower right side of the house; pick up the PIN (B).
- Take a closer look at the window (C); open it with the PIN in your Tools section.
- Go in through the window.
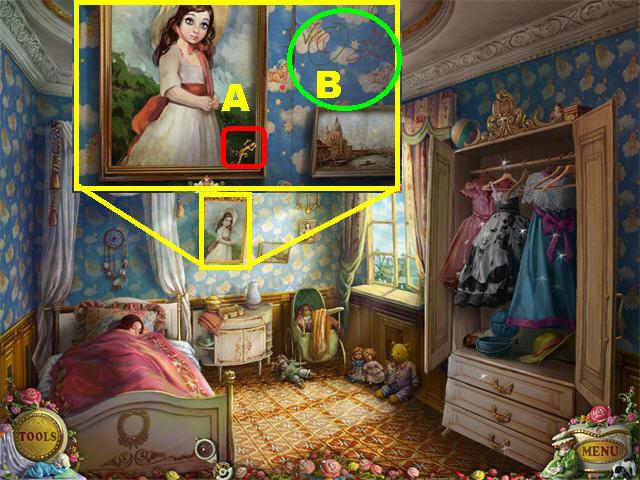
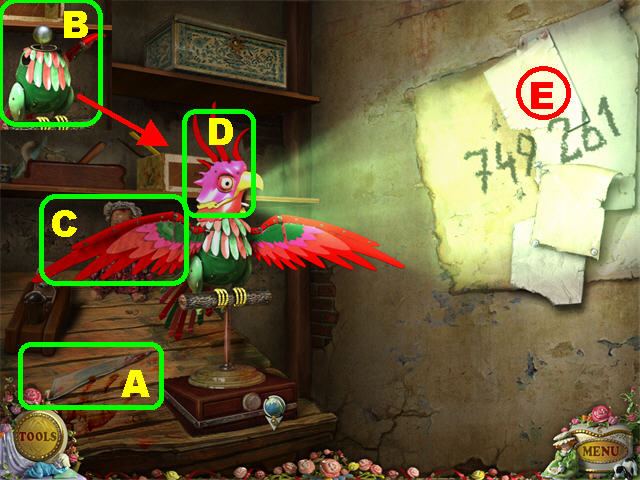
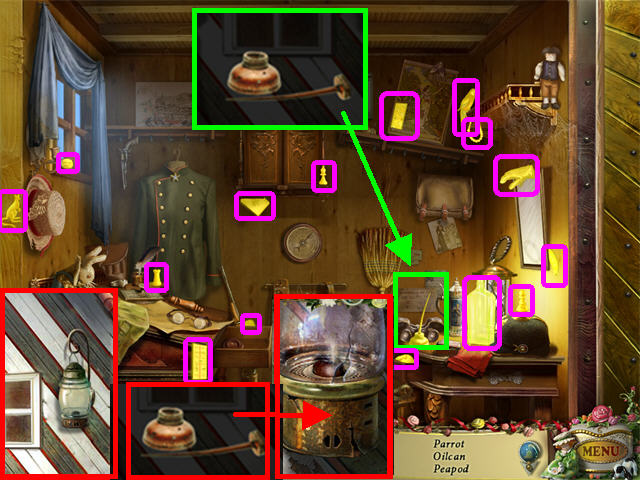
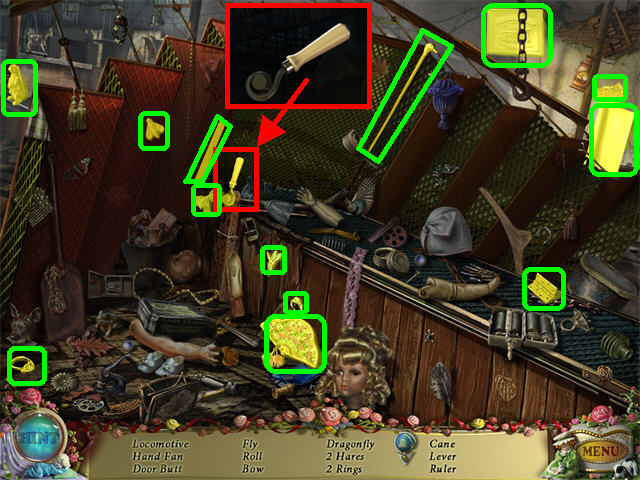
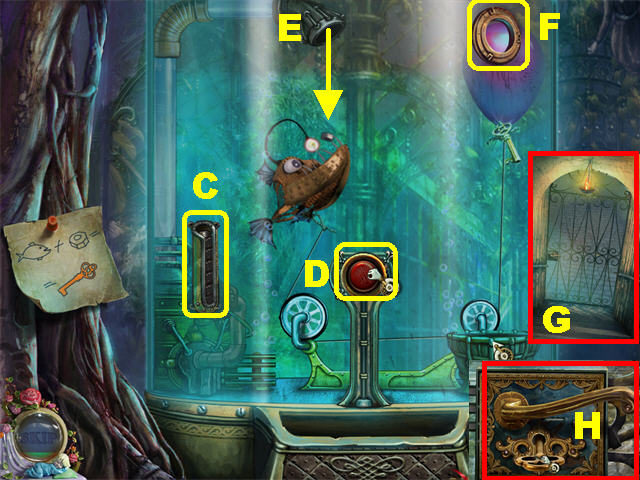
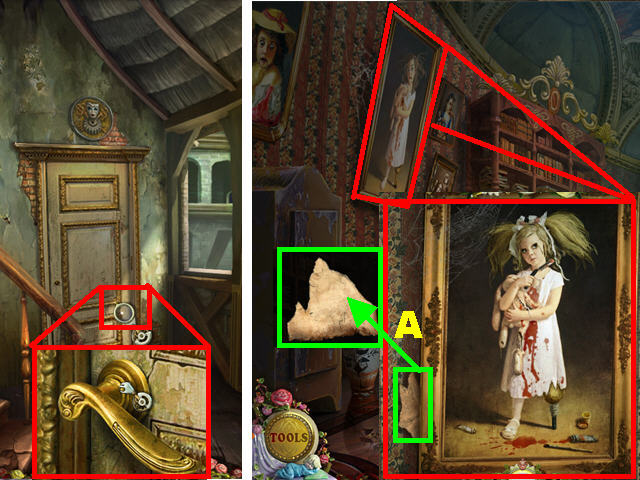
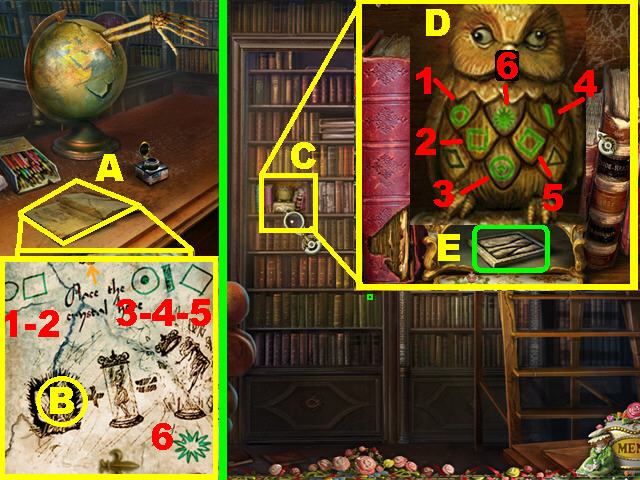
- Zoom into the LARGE PORTRAIT on the back wall; pick up the LIZARD ORNAMENT (A) in the lower right side of the frame.
- Note the PATTERN (B) on the wallpaper; you will need that solution for a puzzle.
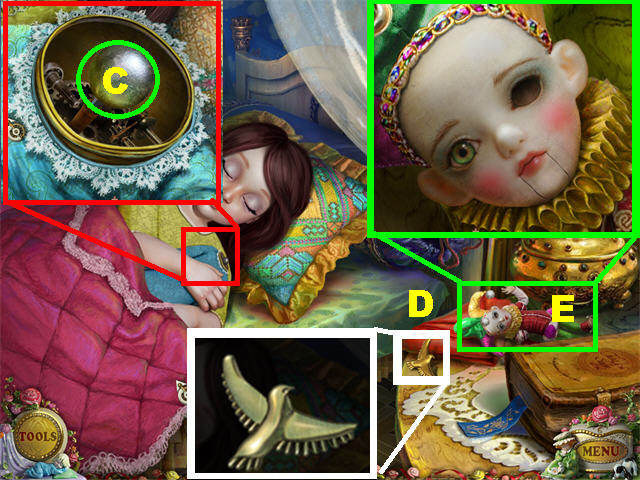
- Zoom into the bed; then the little girl. Pick up the MECHANICAL DOLL PART (C) on the headless doll.
- Pick up the BIRD ORNAMENT (D) on the dresser.
- Note the JESTER PUPPET (E) on the dresser, when you click on it you will see it is missing an eye. Close the pop-up window.
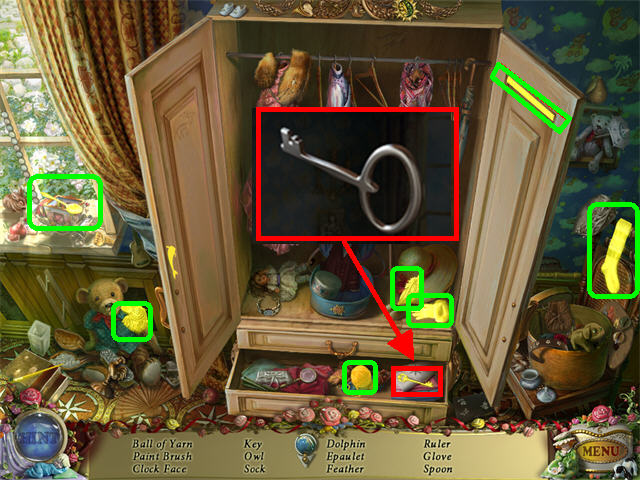
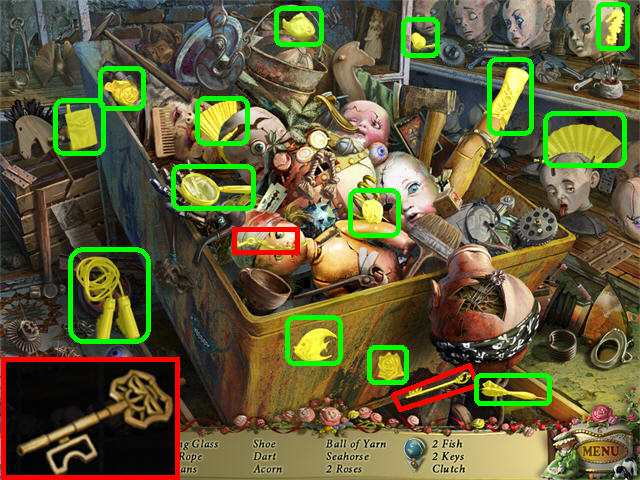
- Click on the wardrobe to open it; click again to trigger a Hidden Object Scene.
- Open the middle drawer to look for objects.
- The KEY will be added to inventory once your search has been completed.
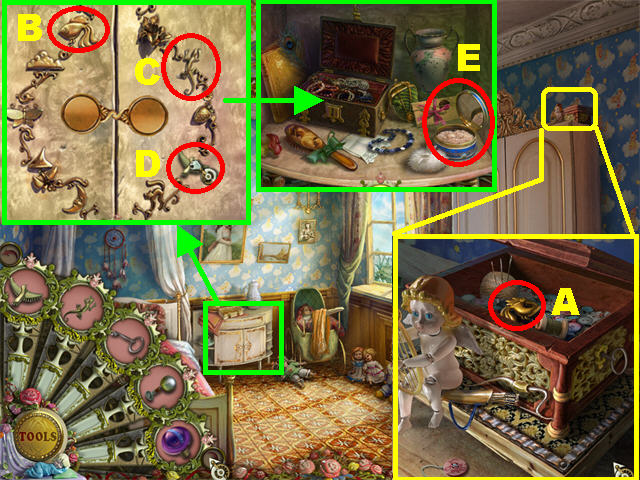
- Take a closer look above the wardrobe to find a music box.
- Place the KEY on the side of the music box; click on the KEY 3 times to make it play.
- Pick up the FISH ORNAMENT (A) inside the music box once it opens.
- Take a closer look at the dresser and place the FISH ORNAMENT (B), LIZARD ORNAMENT (C), and BIRD ORNAMENT (D) as shown in the screenshot to unlock the drawer.
- Zoom into the drawer; pick up the POWDER COMPACT (E) inside.
Chapter 2: Puppet Shop

- Click down twice, forward and right towards the Guard’s Hut.
- Click on the door twice to trigger a Hidden Object Scene.
- The CROWBAR will be added to inventory.
- Note the oil-dripping lamp (A) on the side of the hut.
- Go down and then forward.
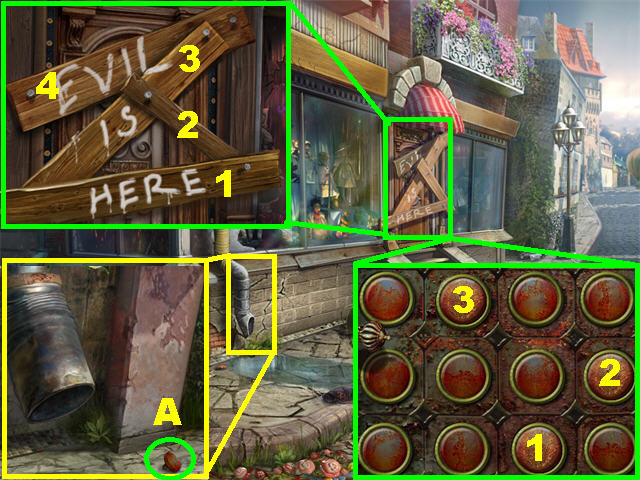
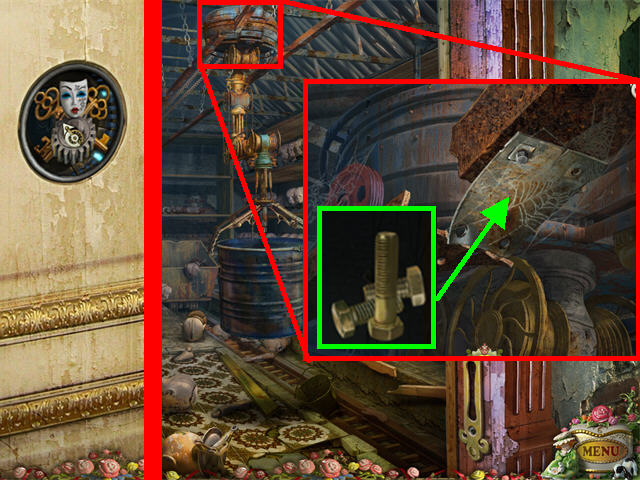
- Zoom into the dripping pipe on the side of the shop; pick up the RED BUTTON (A) in the lower right.
- Take a closer look at the door; eliminate the boards with the CROWBAR, always pulling the board on top first.
- Zoom into the buttons on the door.
- Place the RED BUTTON on the panel.
- Place the COMPACT POWDER on the buttons to see which ones to press.
- Click on the buttons according to order in screenshot and click on the handle to open door.
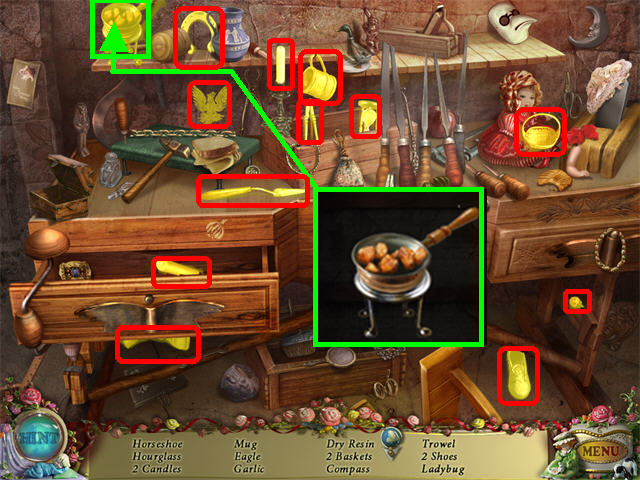
- Enter the Puppet Maker’s Shop.
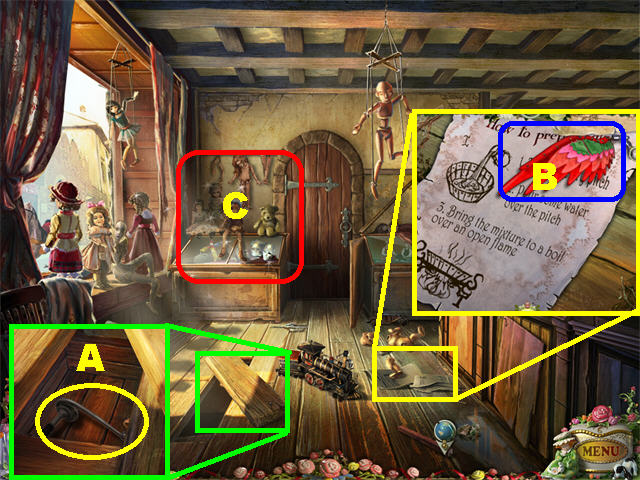
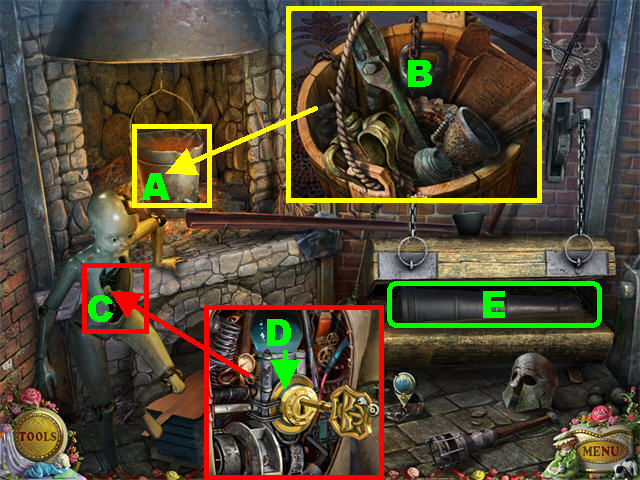
- Loosen the FLOORBOARD in the lower left side of the ground with the CROWBAR; pick up the HANDLE (A).
- Zoom into the SKETCH on the ground. Click on the papers several times and pick up the MECHANICAL WING (B).
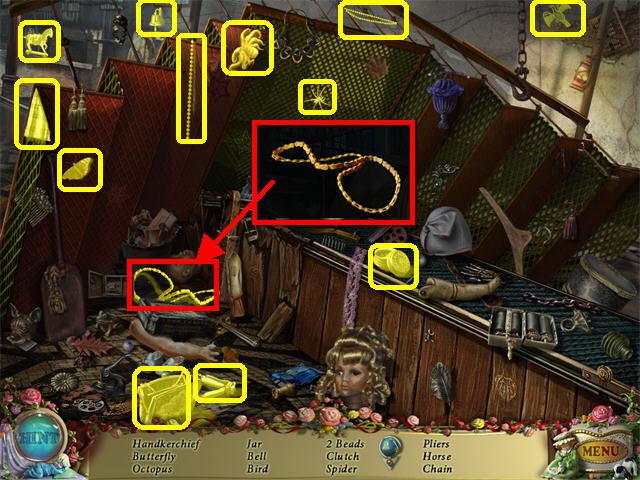
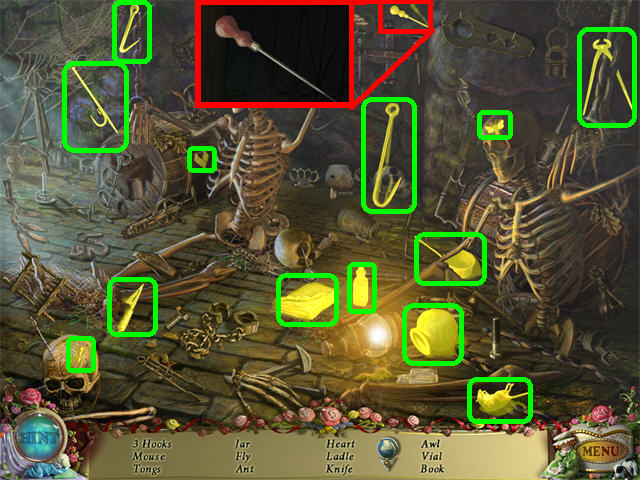
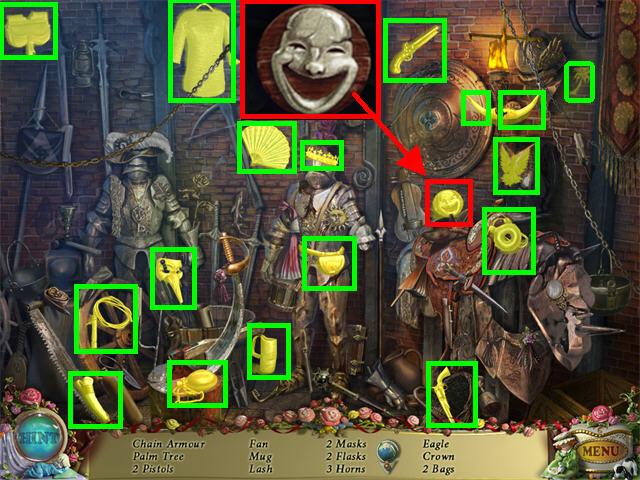
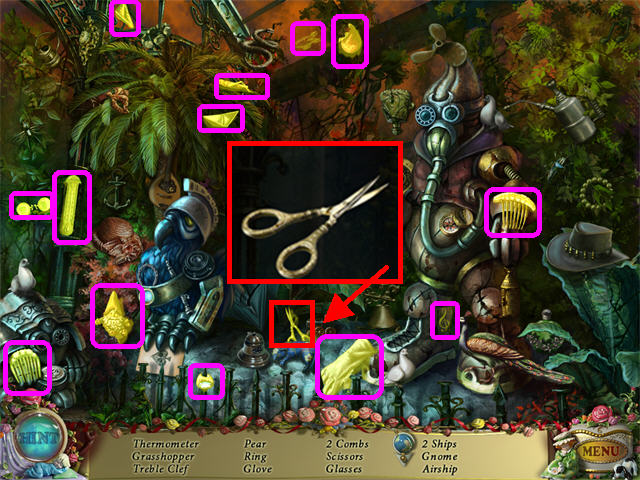
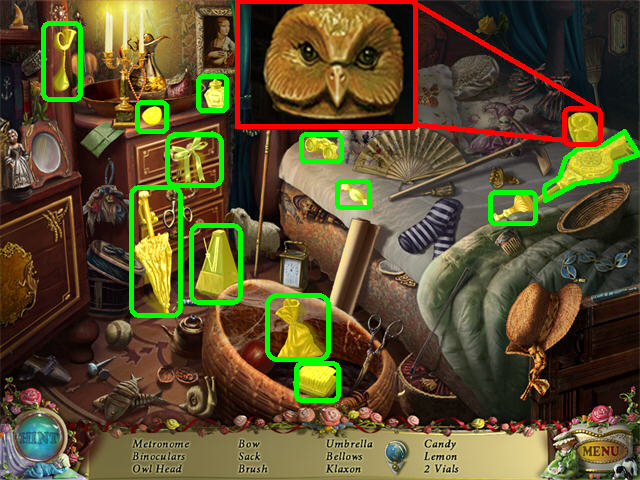
- Click on the Hidden Object Scene (C) on the left.
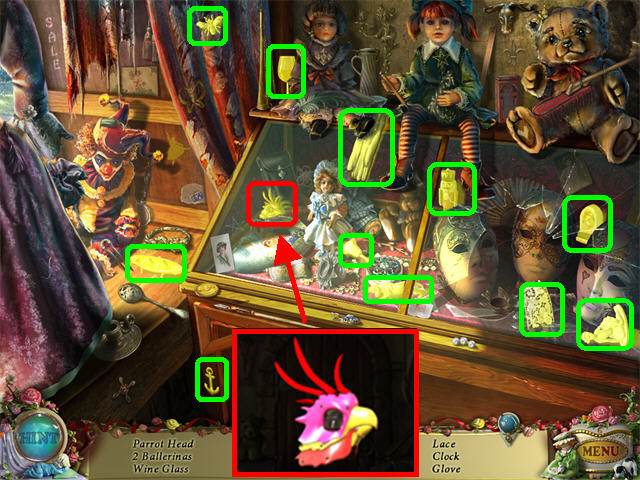
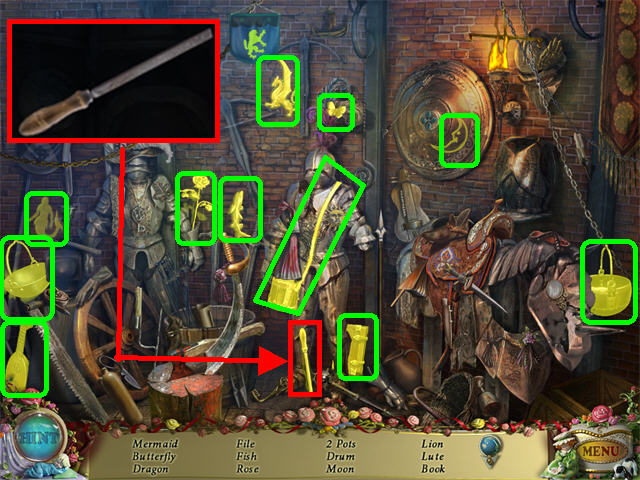
- Pick up all the items on the list.
- The PARROT HEAD will be added to inventory.
- Take a closer look at the shelves on the right.
- Pick up the GLASS SHARD (A) in the lower left.
- Place the DOLL PART (B) in the head socket of the MECHANICAL BIRD.
- Place the MECHANICAL WING (C) and the PARROT HEAD (D) on the MECHANICAL BIRD.
- The Bird projects a film on the wall. Note the numbers “749261” (E) projected on the right side of the wall.
- Exit out of that view.
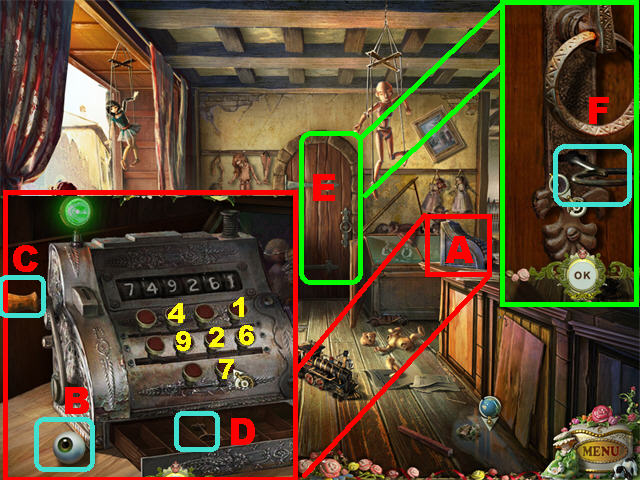
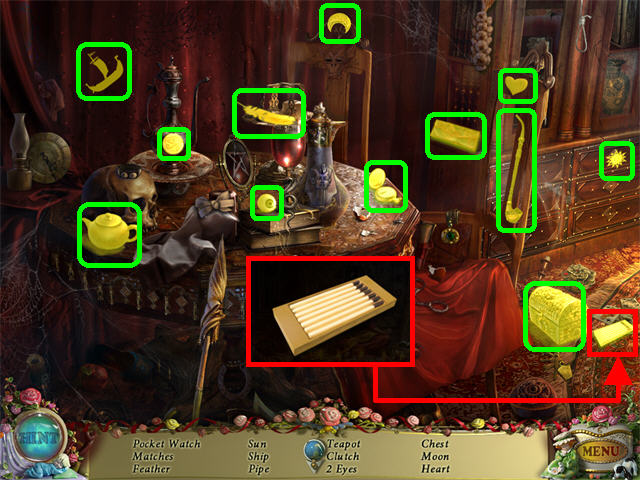
- Zoom into the CASH REGISTER (A) on the counter.
- Pick up the PUPPET EYE (B) on the counter.
- Place the HANDLE (C) on the side of the cash register.
- Enter the correct combination to open the cash register.
- If you make a mistake, click on the HANDLE (C) to reset the numbers.
- Enter the numbers “749261” on the cash register keys. Please look at the screenshot for the solution.
- Pick up the KEY (D) inside the cash register.
- Take a closer look at the back door (E).
- Place the KEY (F) in the lock. The lock needs oil.
- Go back to the Girl’s Bedroom.
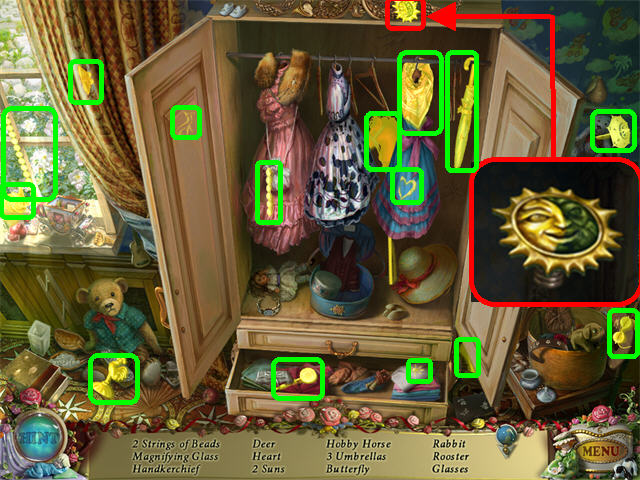
- Click on the wardrobe to trigger a Hidden Object Scene.
- The SUN will be added to inventory.
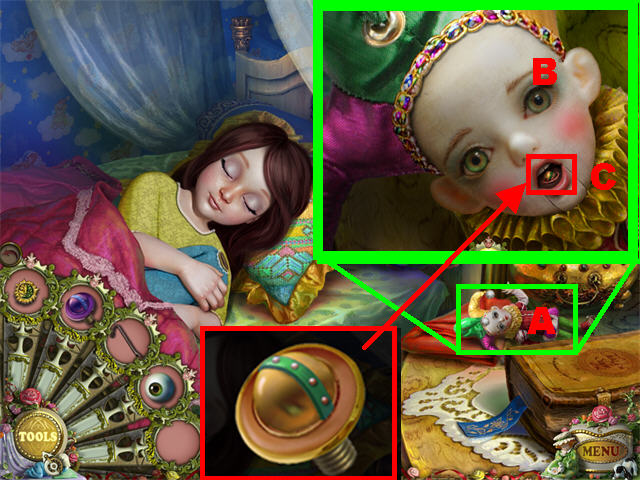
- Zoom into the bed on the left; click on the JESTER DOLL (A) and place the PUPPET EYE (B) in the eye sockets.
- Pick up the PLANET 2/3 (C) in the jester’s mouth.
- Go back to the Guard’s Hut.
- Click on the Hidden Object Scene.
- The EMPTY OIL CAN will be added to inventory.
- Zoom into the LAMP in the upper right side of the hut and fill up the OIL CAN with the oil dripping from the lamp.
- Go back to the Puppet Shop.

- Click on the Hidden Object Scene.
- The BROOM will be added to inventory.
- Take a closer look at the door; place the full OILCAN in the lock. Click on the key to unlock the door.
- Go through the door to reach the Workshop.
Chapter 3: The Workshop

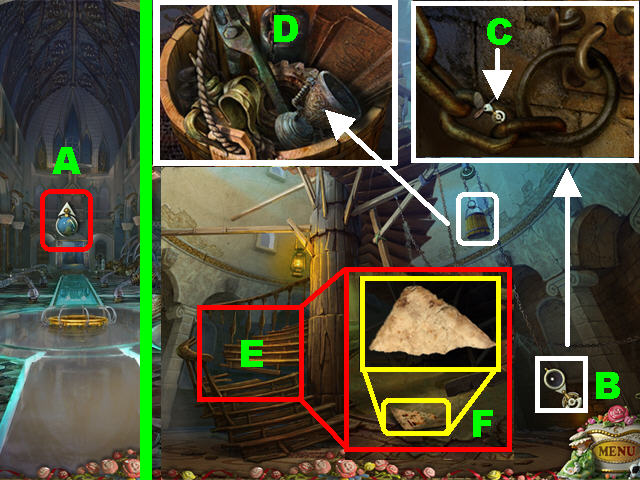
- Use the CROWBAR to defend yourself against the MECHANICAL CRAB (A) in the lower center.
- Zoom into the far right corner; pick up the SCREWDRIVER (B).
- Take a closer look at the broken mechanical crab.
- Use the SCREWDRIVER to loosen the screw on the VALVE (C). Pick up the VALVE to add it to inventory.
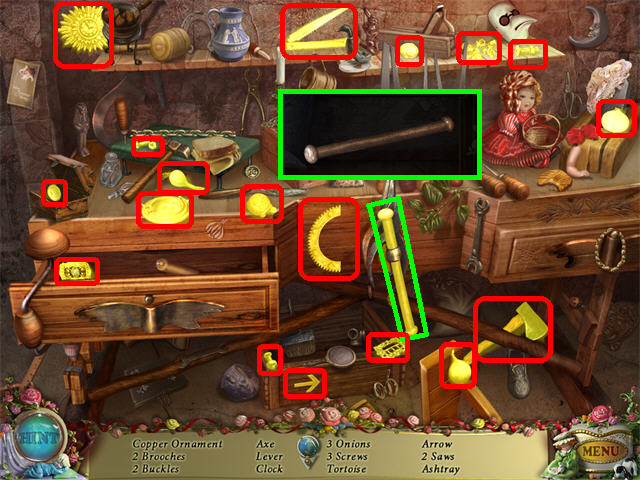
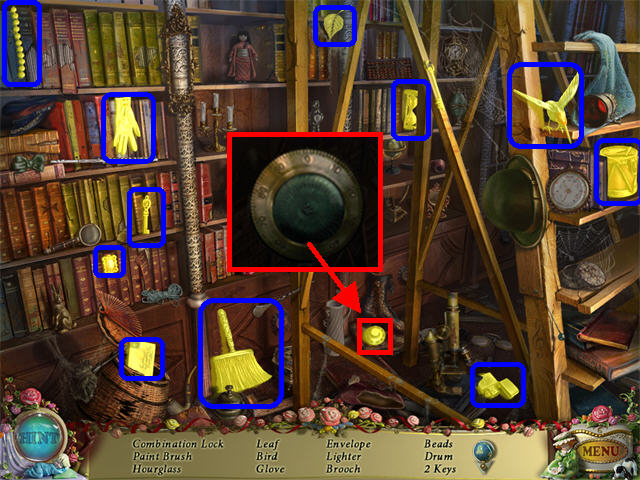
- Click on the Hidden Object Scene on the left.
- Open the left drawer and look for items on the list.
- The VICE HANDLE will be added to inventory.
- Zoom into the workbench in the back of the scene.
- Place the VICE HANDLE (A) on the VICE.
- Place the GLASS SHARD (B) on the VICE and it will tighten around the glass shard.
- Pick up the PLANET 3/3 (C) on the right side of the vice.
- Go outside and head towards the house on the left.
Chapter 4: Fortune Teller’s House
- Take a closer look at the poster on the right.
- Click twice on the poster to tear it.
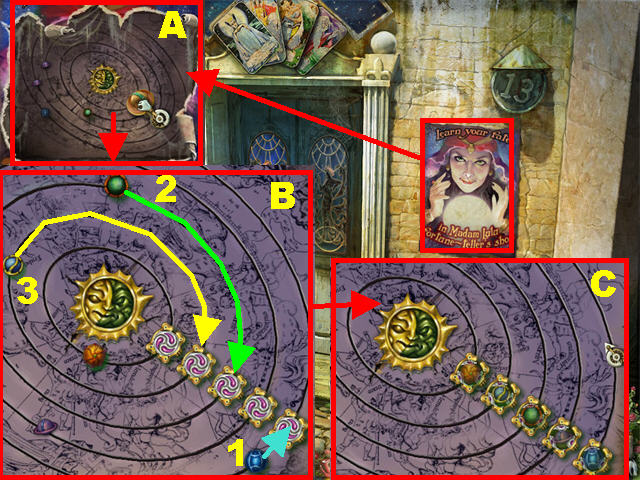
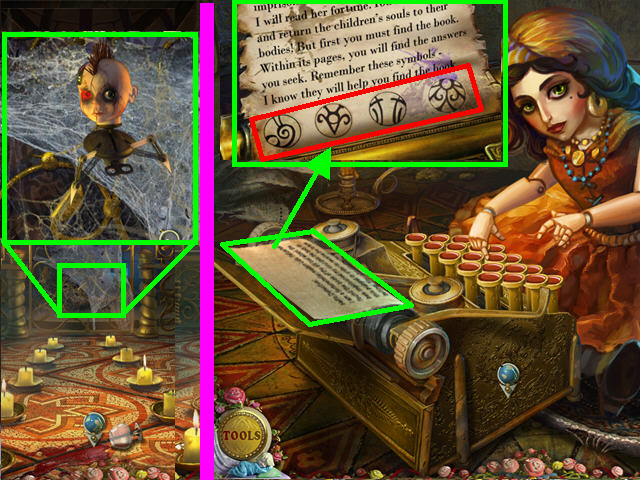
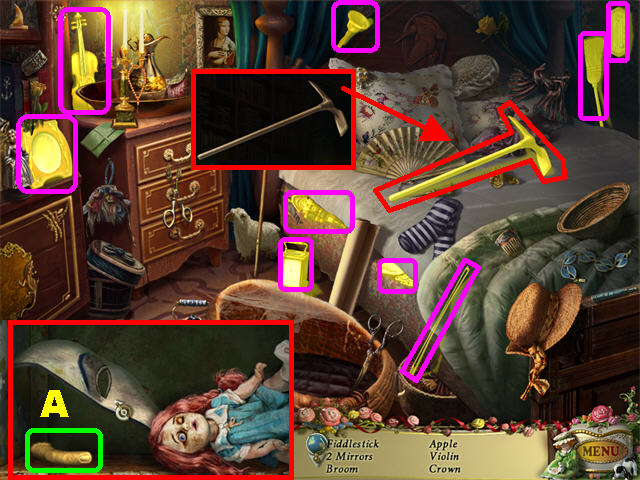
- Use the BROOM on the cobwebs three times (Fig A).
- Place the SUN and the 3 PLANETS on the galaxy (Fig A).
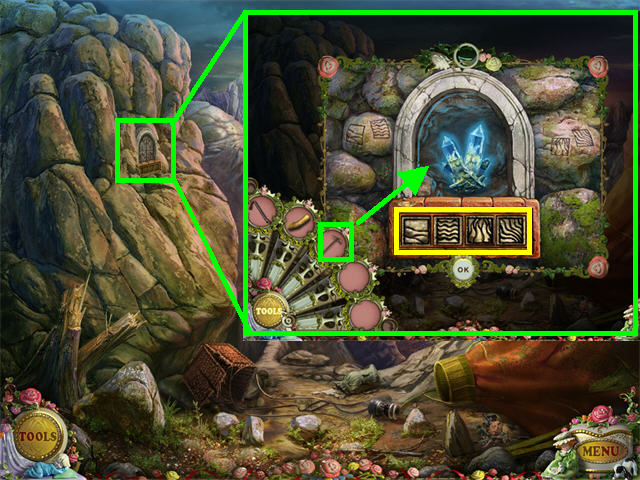
- Click on the galaxy to trigger a puzzle.
Click the Large Blue Planet towards the swirl in its track; then click the Green and Small Blue Planets into their swirls (Fig B).
- Fig. C shows you the final solution. Go through the door.
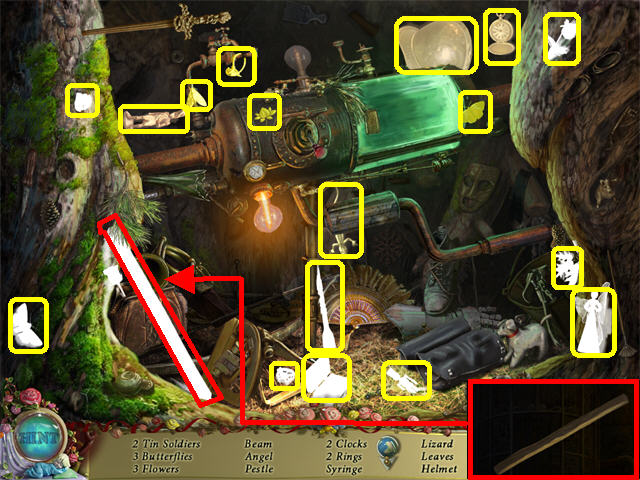
- Click on the Hidden Object Scene on the left.
- The LEATHER BELT will be added to inventory.
- Go back to the Workshop in the Puppet Shop.
- Click on the Hidden Object Scene in the Workshop.
- The BURNER OF DRIED PITCH is added to inventory.
- Go back to the Fortuneteller’s House.
- Click on the Hidden Object Scene.
- The MATCHES will be added to inventory.
- Go outside of the Puppet Shop.
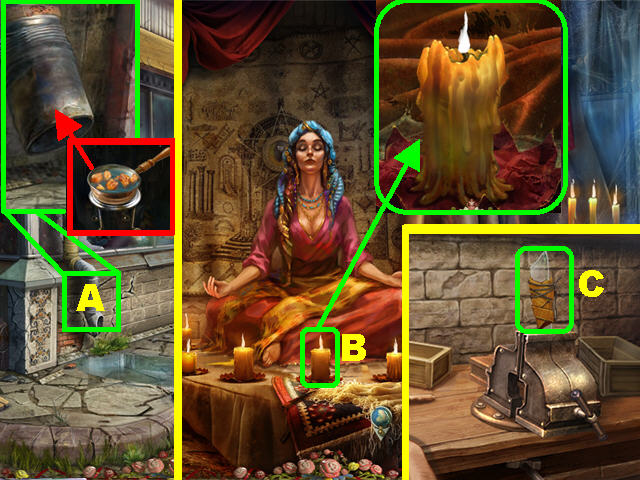
- Zoom into the dripping PIPE (A); place the BURNER OF DRIED PITCH under the pipe to acquire the PITCH MIXTURE.
- Go back inside the Fortuneteller’s House.
- Zoom into the fortune teller.
- Click on the center CANDLE for a closer look; place the PITCH MIXTURE on the flame to create GLUE.
- Go back to the Workshop inside the Puppet Shop.
- Zoom into the workbench; place the LEATHER BELT and the STRING on the GLASS SHARD.
- Pick up the GLASS KNIFE (C).
- Leave the shop and go right.
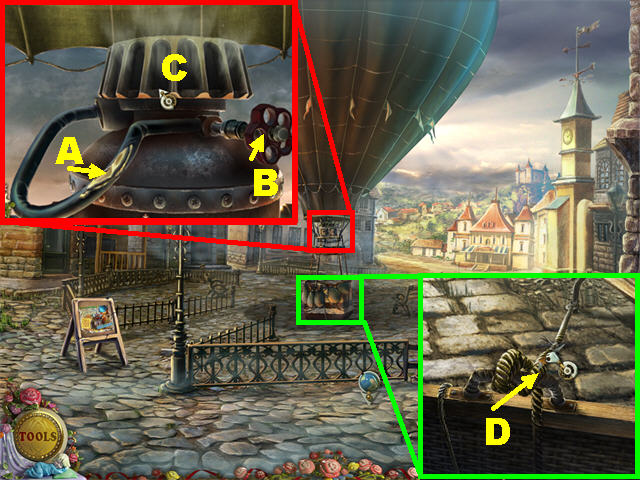
- Zoom into the upper part of the hot air balloon.
- Place the GLUE on the broken HOSE (A) to patch it up.
- Place the VALVE on the BURNER (B); turn the VALVE to start the gas flowing.
- Place the MATCHES on the BURNER (C).
- Take a closer look at the edge of the basket; cut the ROPE (D) three times with the GLASS KNIFE.
Chapter 5: Castle Gates
- The MATCHES and the CROWBAR will still be in your inventory at the beginning of this chapter.
- Zoom into the lower right; pick up the SANDBAG (A) and the SPIDER PUPPET’S BADGE (B).
- Go forward.
- The Giant Puppet is blocking the door.
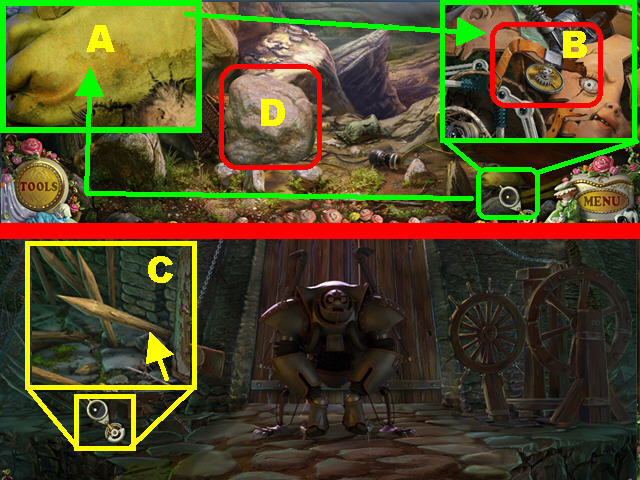
- Zoom into the lower left and use the CROWBAR on the POLE (C) three times to loosen it.
- Pick up the POLE.
- Return to the crash site.
- Remove the large STONE in the lower left with the POLE (D) to trigger a Hidden Object Scene.
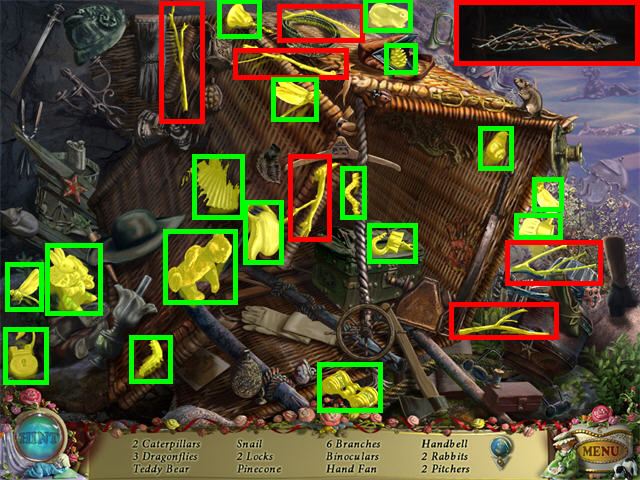
- Look for all the items on the list.
- KINDLING will be added to inventory.
- Go back to the gate.
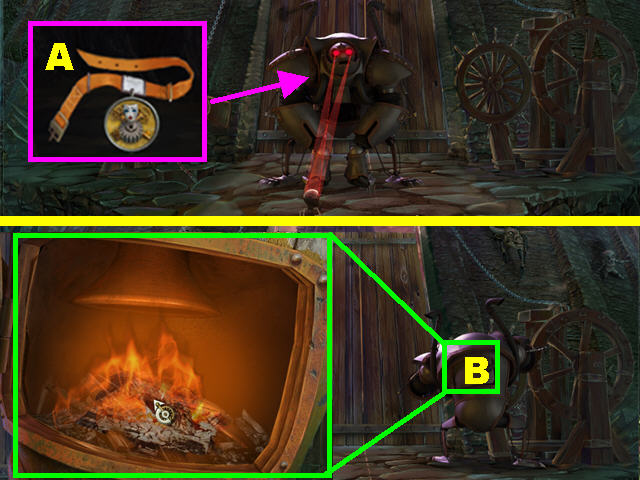
- Give the Giant Puppet the SPIDER PUPPET’S BADGE (A) after one of the puppet’s passes by him and it will start to open the gate.
- Open the back of the Giant Puppet (B); place the KINDLING and the MATCHES on the coal.
- The Giant Puppet will finish opening the gate; go through it.

- Zoom into the NOTE (A) on the lower left; pick up the RUNE 1/4 (B).
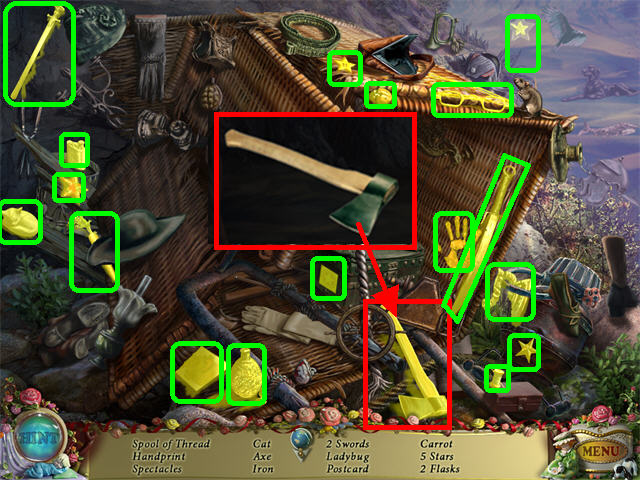
- Go back to the crash site; play the Hidden Object Scene.
- The AXE will be added to inventory.
- Go back to the elevator.
- Zoom into the lower right (C).
- Cut the ROOTS three times with the AXE to trigger a Hidden Object Scene.
- Click on the SWITCH (D) to turn the lights on and off.
- The LEVER will be added to inventory.
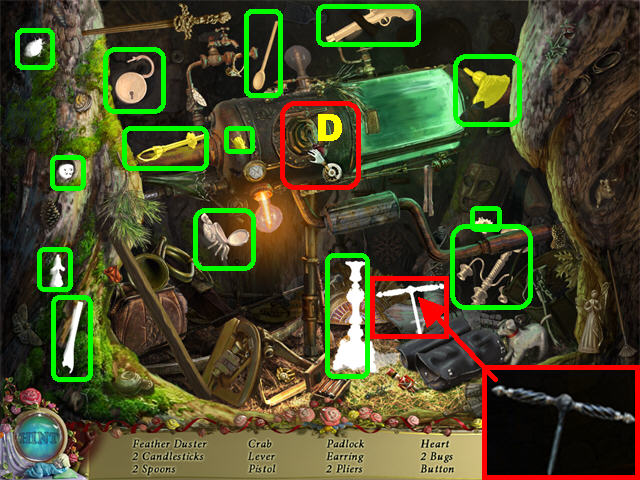
- Click on the MECHANISM (A) on the back wall for a closer look.
- Place the LEVER (B) in the upper left.
- Pull the LEVER to activate the mechanism.
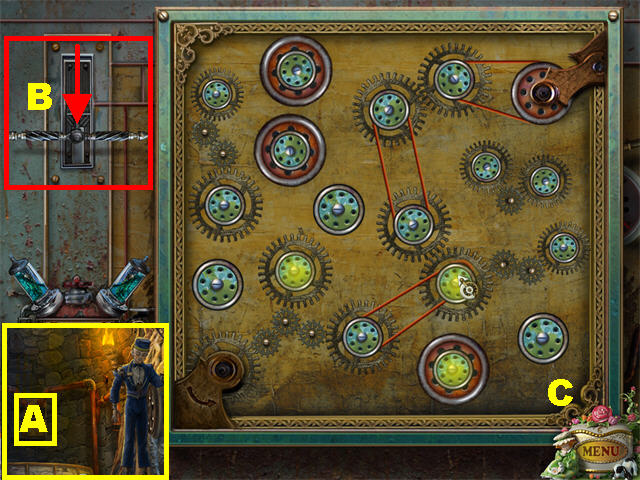
- Connect the gears with the belts.
- Remove a belt and all possible connections will light up. Choose a connection.
- Please look at the screenshot for the solution (Fig. C).
- The elevator will come down after the puzzle has been solved. Click on the elevator to go upstairs.
Chapter 6: First Tower
- Zoom into the HOLE (A) on the far left side; place the SANDBAG in the hole.
- Go to the far left (B) after the puppet on a bicycle enters that section.
- Zoom into the GLASS (C); pick up the CLAY TABLET (D).
- Exit and go through the RIGHT STEPS (E).
- Click on the puzzle on the door.
- Place the CLAY TABLET on the door.
- Drag the puzzle pieces around until you form three figures of different colors. The bars can slide up and down, or left to right.
- Once a color is in the right spot, the light below it will light up.
- Please look at the screenshot for the final solution.
- Go through the door to access the Gallery.
- Click on the Hidden Object Scene on the right.
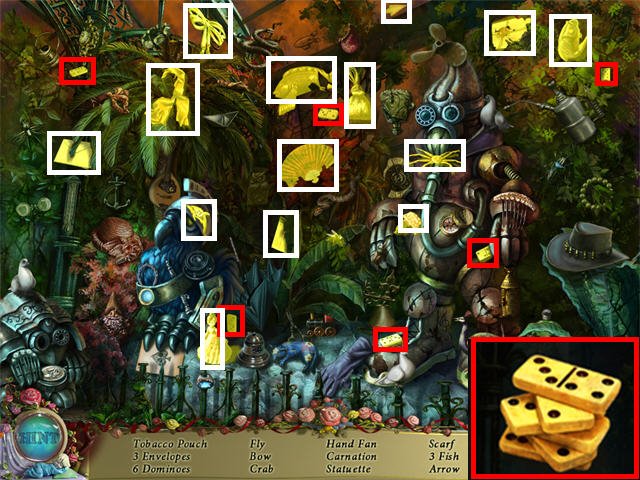
- The DOMINOES will be added to inventory.
- Go forward.
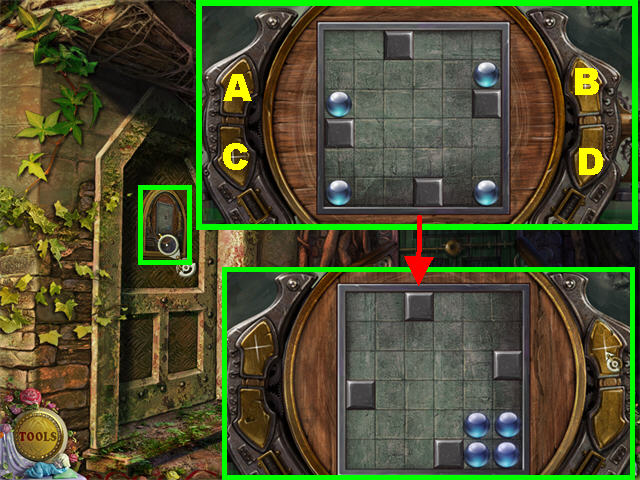
- Click on the left door to trigger a puzzle.
- The levers on both sides of the puzzle go up or down.
- The goal is to place all the balls adjacent to one another, in the corner.
- The ARROWS have been labeled A, B, C, and D.
- Click on the arrows in the following manner to solve the puzzle:
D-D-B-B-B-D-D-B
- Here is an alternate solution:
A-A-C-C-B-D-D-B
- Go through the door to access the factory.
Chapter 7: Factory
- Take a closer look at the DOOR (A) on the right.
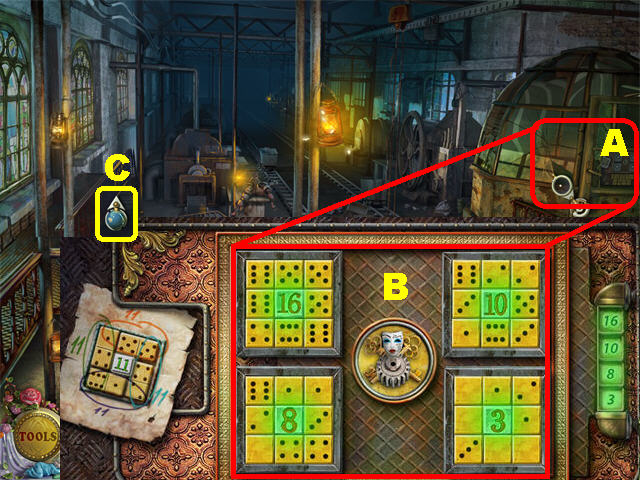
- Place the DOMINOES on the board.
- The dominoes must be placed on the board so the sum of their rows or columns adds up to the total in the center of the box.
- The dominoes cannot be rotated; you have to use the vertical or horizontal ones in the right spots.
- The correct boxes will light up green.
- Please look at the screenshot (B) for the solution.
- Go left (C) to reach the Conveyor Area.
- Click on the Hidden Object Scene.
- The HANDLE will be added to inventory.
- Click in the lower right and then click down.
- Zoom into the DOOR (A) on the right, place the HANDLE on the lock and turn the lever to open the door.
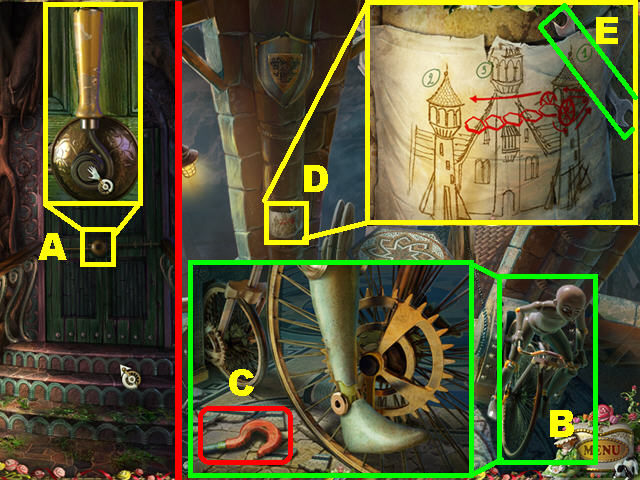
- Zoom into the BICYCLE (B); pick up the CRANE HOOK (C) on the ground.
- Look at the DIAGRAM (D) on the left side of the wall, it shows you the three towers in the castle; two are connected by a drawbridge.
- Pick up the WRENCH (E) in the upper right side of the drawing.
- Return to the Conveyor Area by clicking down, through the left door and left.
- Open the Hidden Object Scene on the right.
- The BICYCLE CHAIN will be added to inventory.
- Go back to the Balcony area with the BICYCLE.
- Place the BICYCLE CHAIN on the BICYCLE; the bridge will appear as the puppet pedals.
- Cross the bridge by clicking on the Second Tower in the back of the scene.
Chapter 8: Second Tower
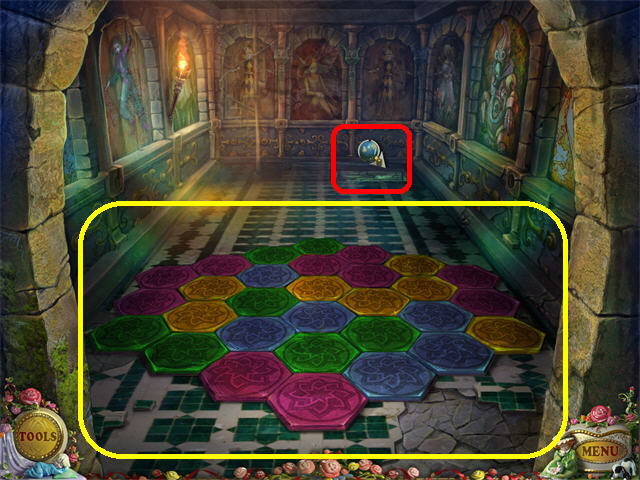
- To unlock the grid, place the colors on the floor so that no like colors touch each other.
- Click on two sets of tiles to swap their positions.
- Please look at the screenshot for the solution.
- Click on the far right corner to reach the stairway.
- Zoom into the middle left window; pick up the ARROW BUTTON (A).
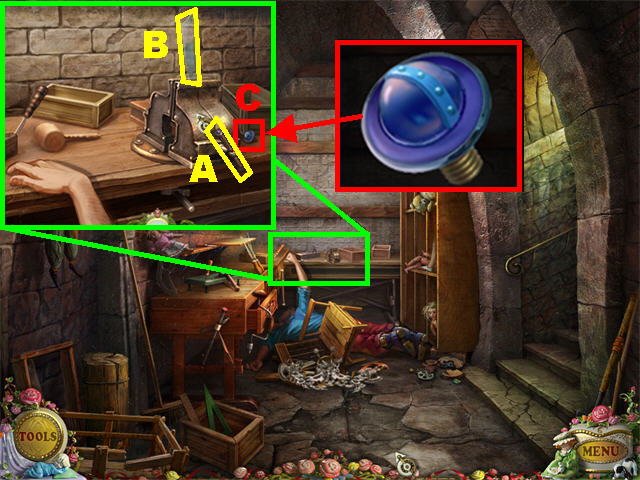
- Zoom into the small DOOR (B) in the lower right; remove the PLANKS with the CROWBAR in the order shown on the screenshot.
- Click on the Hidden Object Scene that appears at the door in the lower right.
- The AWL will be added to inventory.
- Click down three times, through the left door and left to return to the Conveyor Area.
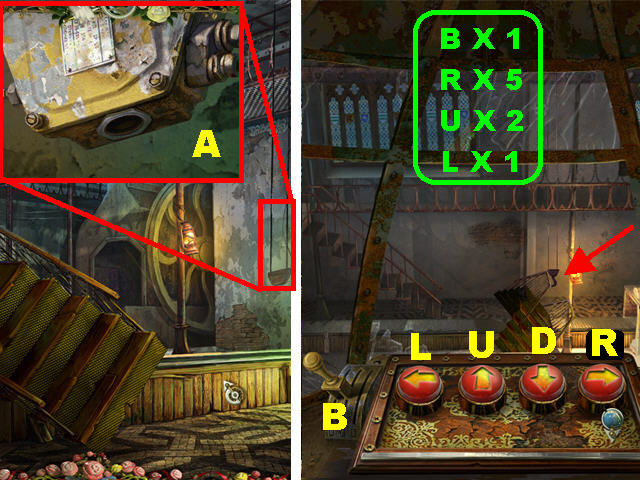
- Zoom into the CRANE on the right; place the CRANE HOOK there (A).
- Exit this location in the lower right; enter the Control Room on the right.
- Place the ARROW BUTTON on the panel.
- Use the buttons to lift the bridge with the crane.
- The buttons have been labeled in the screenshot: L=Left, R= Right, U=Up, D= Down and B = Lever.
- To solve the puzzle, press the buttons in the following order:
Lever (B) 1 Time
Right 5 Times
Up 2 Times
Left 1 Time
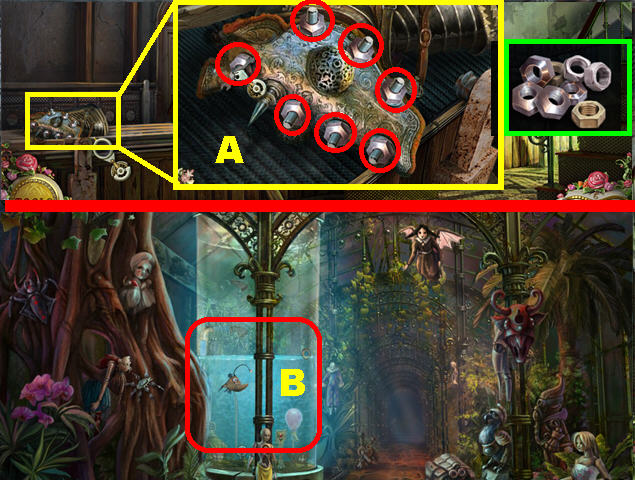
- Return to the Conveyor Area; zoom into the mechanism on the lower left.
- Remove the NUTS (A) circled in red with the WRENCH.
- Go back to the Gallery (B), the area that houses the large fish tank.
- Zoom into the fish tank.
- Place the NUTS in the SLOT (C) on the lower left.
- Click on the RED BUTTON (D) to drop the nuts as the fish moves forward. Time it so that you click the button as you hear the bell ring.
- The fish will catch the nuts as they fall down from the PIPE (E) in the upper center.
- Each time the fish swallows a nut, the balloon on the right will rise.
- After the fish eats four nuts, the balloon will rise to the OPENING (F) in the upper right; pierce the balloon with the AWL.
- The KEY will be added to inventory.
- Go forward three times and click on the far right corner of the Trapdoor.
- Zoom into the DOOR (G) at the bottom of the steps; place the KEY on the LOCK (H). Click on the key to unlock it. Go through the door to enter the Arsenal.
Chapter 9: Arsenal
- Play the Hidden Object Scene on the right.
- The MASK will be added to inventory.
- Zoom into the board on the lower left side of the ground.
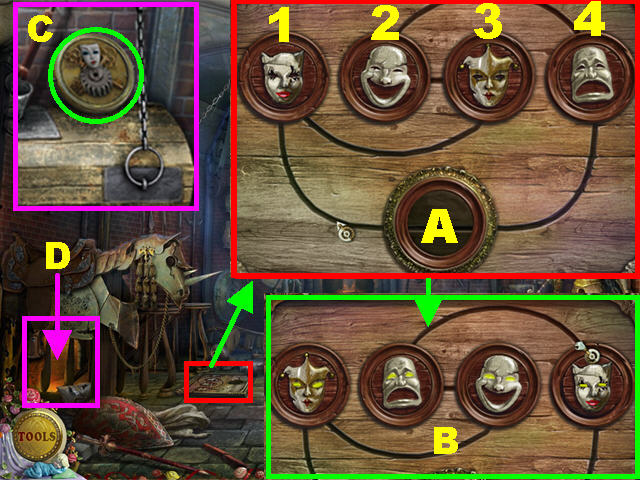
- Place the MASK on the board to begin the puzzle.
- Move the masks around so they are on top of their matching silhouettes.
- The masks can only move through the grooved lines on the board.
- The mask eyes will glow green when placed correctly.
- The masks have been marked with numbers in the screenshot (Fig. A). Move Masks 1, 3, 2, 4, and 1 (in that order) to solve the puzzle.
- Please look at Fig. B for the image of the final solution.
- Zoom into the back of the scene; pick up the SIGN (C) in the lower right.
- Exit that view, click in the lower left (D) to access the Candle Room; then go right to the Library.
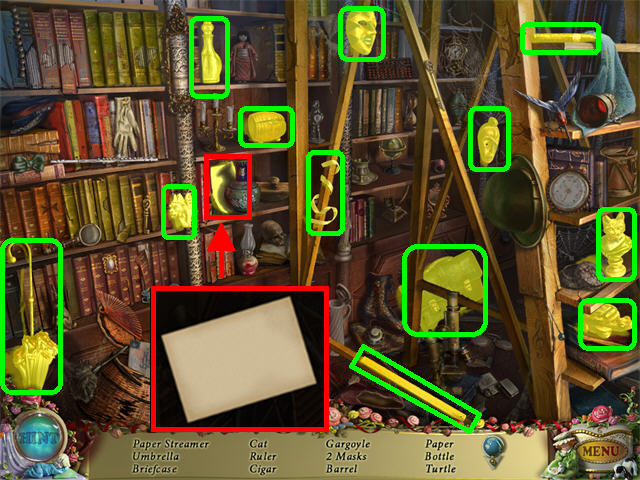
- Click on the Hidden Object Scene in the lower right.
- The PAPER will be added to inventory.
- Click down.
- Zoom into the spider puppet in the back wall; burn the cobwebs with the MATCHES.
- Go into the room.
- Place the PAPER into the typewriter; click on the doll to start it typing.
- Click on the PRINTED PAPER; make note of the symbols at the bottom of the page.
- Exit, go right and zoom into the desk.
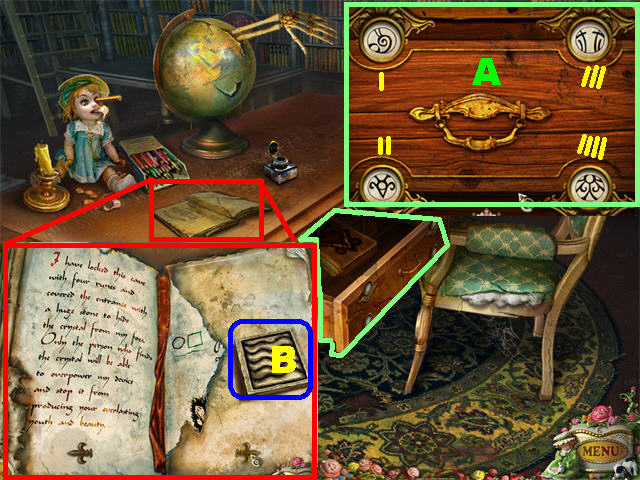
- Click on the drawer to begin the puzzle.
- Click and change the symbols to reflect the images on the paper from the typewriter.
- The scratches on the wood show the order of the symbols.
- Please look at the screenshot (A) for the correct order.
- Click on the book in the drawer and it will land on the desk; click it again to open it.
- Turn all the pages and pick up RUNE 2/4 (B) on the last page.
- Note the book has a torn page in the last section; you must go find two pages and place them back in the book.
- Exit, return to the Arsenal by clicking down three times.
- Click on the Hidden Object Scene on the right.
- The FILE will be added to inventory.
- Click down to exit.
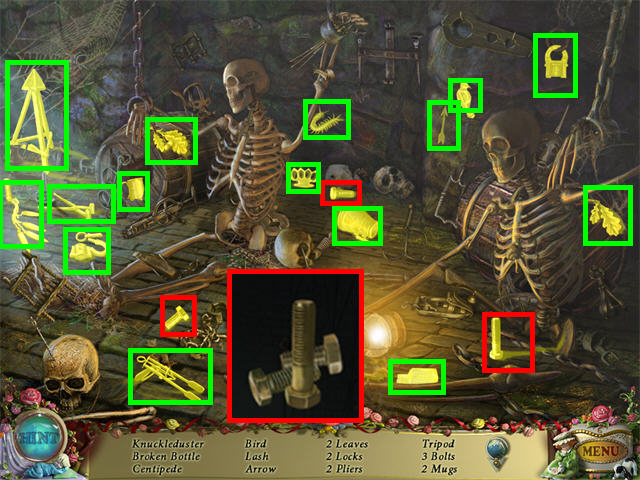
- Play the Hidden Object Scene.
- The BOLTS will be added to inventory.
- Click down three times, through the left door, left again, and zoom into the left door.
Chapter 10: Puppet Storage
- Place the SIGN on the door to enter the Puppet Storage.
- Zoom into the mechanism in the upper center; place the BOLTS to fix it.
- Click on the Hidden Object Scene in the back.
- The PUPPET KEY will be added to inventory.
- Go back to the Lobby (A) for a brief cut scene; go forward after the cut scene ends.
- Zoom into the CHAINS (B) in the lower right; cut them with the FILE (C) three times.
- Take a closer look at the bucket; pick up the SCRAP IRON (D).
- Zoom into the stairs (E); pick up the TORN PAGE (F).
- Go down to the Elevator; open the Hidden Object Scene.
- The BEAM will be added to inventory.
- Return to the Arsenal in the Second Tower.
- Zoom into the back of the scene.
- Zoom into the BUCKET (A) on the left and place the SCRAP IRON (B) inside.
- Zoom into the PUPPET (C); place the PUPPET KEY (D) on the lock and click on the KEY three times to animate it.
- Pick up the CANNON (E) on the right after the puppet’s animation stops.
- Go to the Gallery (fish tank area); click on the Hidden Object Scene.
- The SCISSORS will be added to inventory.
- Return to the Puppet Storage by the Conveyor Area.
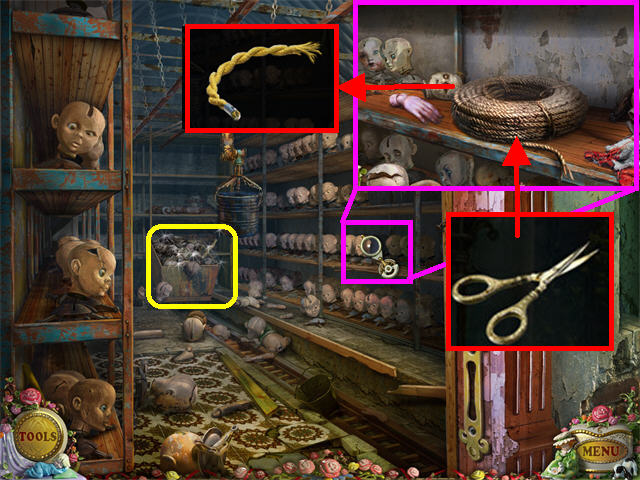
- Zoom into the third shelf on the right; cut a piece of ROPE with the SCISSORS to obtain a WICK.
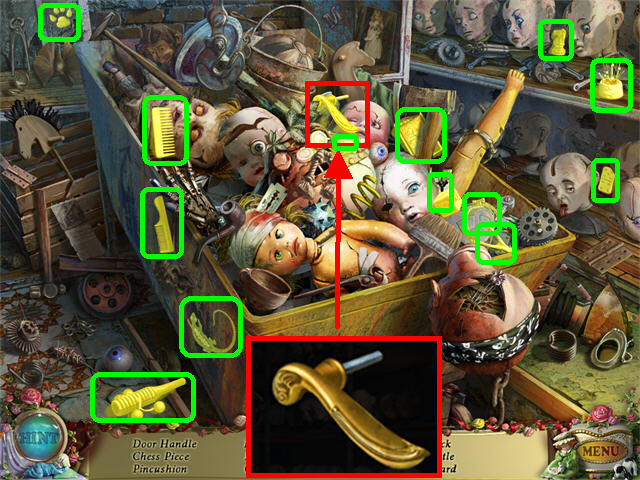
- Play the Hidden Object Scene in the back.
- The DOOR HANDLE will be added to inventory.
Chapter 11: Third Tower
- Return to the Lobby and go forward.
- Zoom into the STAIRS (A); repair them with the BEAM and go up the stairs.
- Take a closer look at the GUN CARRIAGE (B) on the bridge; place the CANNON (C) and the WICK (D) on it.
- Light the WICK (D) with the MATCHES.
- Zoom into the DOOR (E) in the back of the scene; pick up the RUNE 3/4 (F) in the upper left side of the door.
- Go through the door.
- Take a closer look at the bottom door; place the DOOR HANDLE on it and click on the handle to unlock the door. Go through the door.
- Take a closer look at the painting in the upper left; pick up the TORN PAGE (A).
- Play the Hidden Object Scene in the back.
- The OWL HEAD will be added to inventory.
- Return to the Library in the second Tower, to the right of the Candle Room.
- Play the Hidden Object Scene.
- The COMBINATION LOCK will be added to inventory.
- Zoom into the desk; open the BOOK (A).
- Place the TORN PAGES (B) on the right side of the book. The pages show that you need to find a Crystal and the symbols represent the solution for a puzzle.
- Exit and zoom into the left side of the bookcase.
- Take a closer look at the center (C) of the bookcase.
- Place the OWL HEAD (D) on the body to trigger a puzzle. Click on the symbols in the order shown on the screenshot to solve the puzzle. Pick up RUNE 4/4 (E) at the base of the statue.
- Go through the door, which was just revealed, to the Lobby. Go forward, up stairs, forward three times.
- Take a closer look at the SAFE in the lower left.
- Place the COMBINATION LOCK on the safe; click on it and pick up the FINGER (A) inside the safe.
- Play the Hidden Object Scene in the back.
- The PICKAXE will be added to inventory.
Chapter 12: Laboratory
- Click downwards until you reach the balloon crash site.
- Zoom into the small door in the upper left; place the RUNES at the bottom of the door.
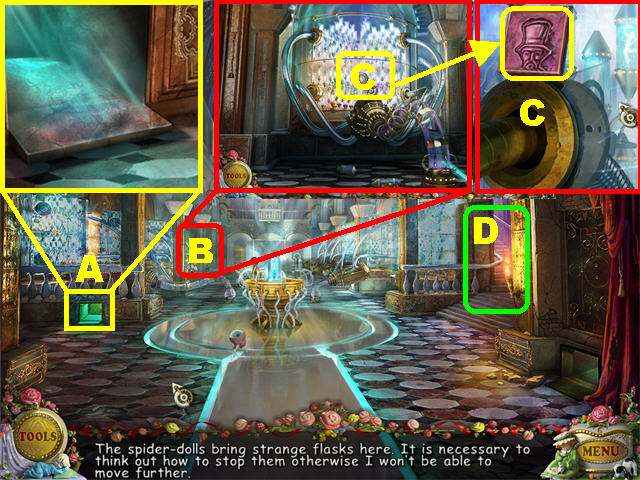
- Use the PICKAXE to retrieve the CRYSTAL.
- From this location go forward seven times; go up the stairs to reach the Observatory door in the upper left.
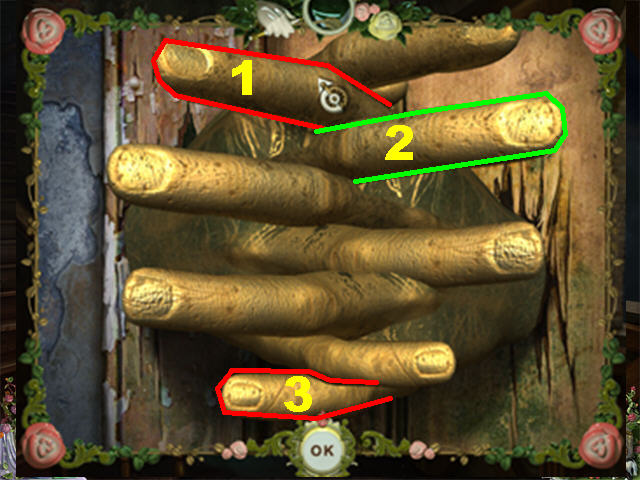
- Zoom into the door; place the FINGER on the door to trigger a puzzle.
- You must click on the fingers in the correct order so that all the fingers remain open.
- Click on the 3 fingers in the order shown in the screenshot.
- Go through the door to enter the Laboratory.
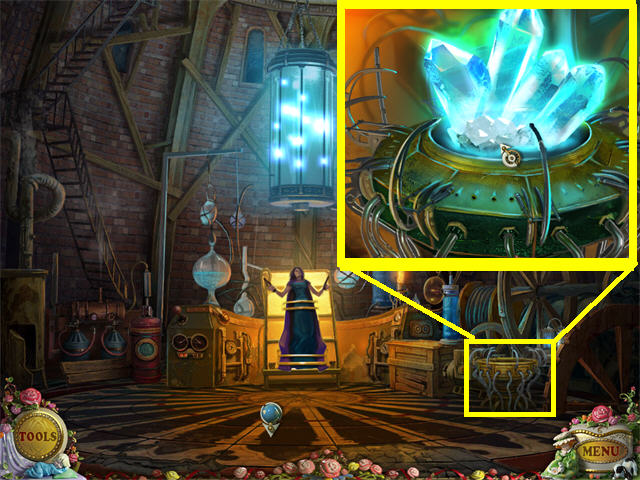
- Zoom into the device on the lower right; use the CROWBAR on the SPIDER PUPPET to destroy it, then place the CRYSTAL in the device.
- Congratulations! You have completed PuppetShow: Souls of the Innocent!


0 comments:
Post a Comment